Amazon Single Node
From Genome Analysis Wiki
Jump to navigationJump to searchBack to parent: GotCloud: Amazon
Introduction
After creating an amazon account (https://aws.amazon.com/), you can start a machine on Amazon using the GotCloud AMI.
The GotCloud AMI contains:
- GotCloud
- Reference Files
- Demo, see GotCloud: Amazon Demo for instructions on running the demo.
If you prefer not to use the GotCloud AMI, you can start up another AMI and install GotCloud as you normally would on a machine. See GotCloud Setup on Any Linux Machine.
Starting the GotCloud AMI
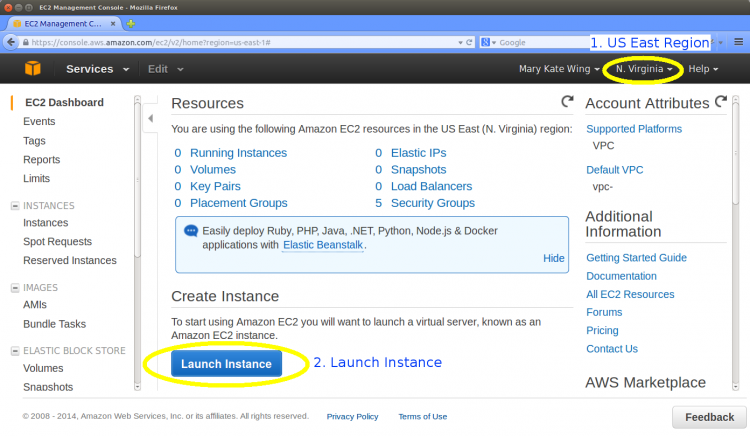
- Go to the EC2 Dashboard: https://console.aws.amazon.com/ec2/v2/home?region=us-east-1#
- If it is not already selected, select
N. Virginiafrom the dropdown menu in the upper right hand corner of the dashboard.- The GotCloud AMI is currently only in the
US East (N. Virginia)region, so be sure you are set to that.
- The GotCloud AMI is currently only in the
- Select the
Launch Instancebutton on the dashboard
- If it is not already selected, select
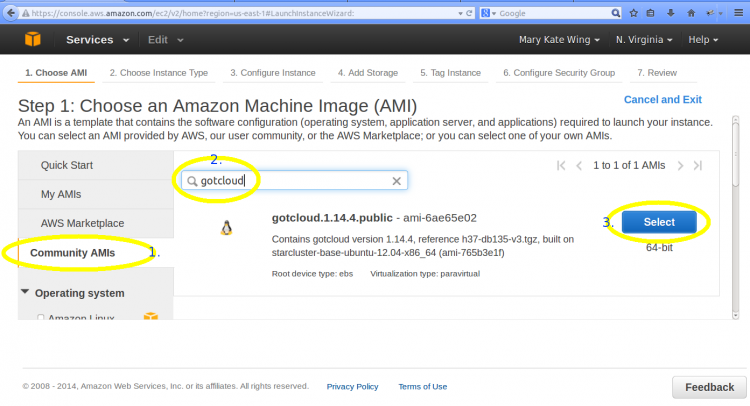
- Select the GotCloud AMI
- Select
Community AMIsfrom the left menu - Type
gotcloud(enter) in the search menu in order to see the GotCloud AMIs - Click the
Selectbutton on the most recent GotCloud AMI
- Select
- Choose an Instance Type
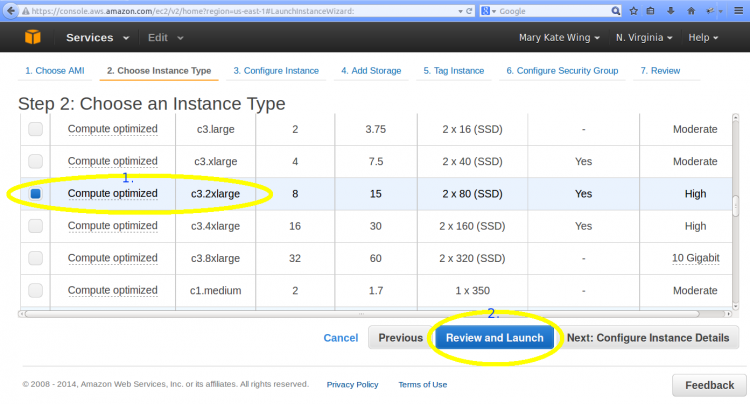
- Select the Instance Type that you would like to run
- For the Demo, we suggest
c3.2xlarge
- For the Demo, we suggest
- Click the
Review and Launchbutton- Optionally you can select
Next:Configure Instance Detailsto additional steps
- Optionally you can select
- Select the Instance Type that you would like to run
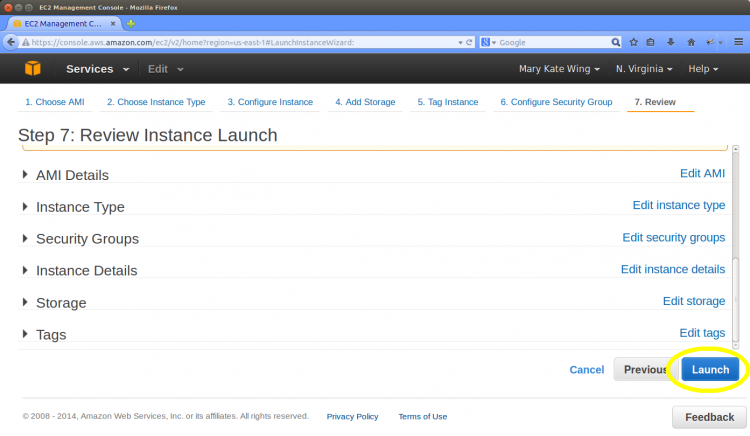
- Review Instance Launch
- Make any updates you would like
- You can increase the default storage volume or add additional volumes by selecting
Edit storage
- You can increase the default storage volume or add additional volumes by selecting
- When everything is as you like, click the
Launchbutton
- Make any updates you would like
- Select/Create key pair
- If you have an existing key pair that you want to use:
- Select
Choose an existing key pair - Select the key pair
- Check the box to acknowledge that you have access to the private key
- Click
Launch Instances
- Select
- If you want to create a new key pair:
- Select
Create a new key pair - Name your key pair in the
Key pair namefield - Select
Download Key - Click
Launch Instances
- Select
- If you have an existing key pair that you want to use:
- You will then see a
Launch Statuspage- Click the
View Instancesbutton in the bottom corner of the page to view your instances.
- Click the
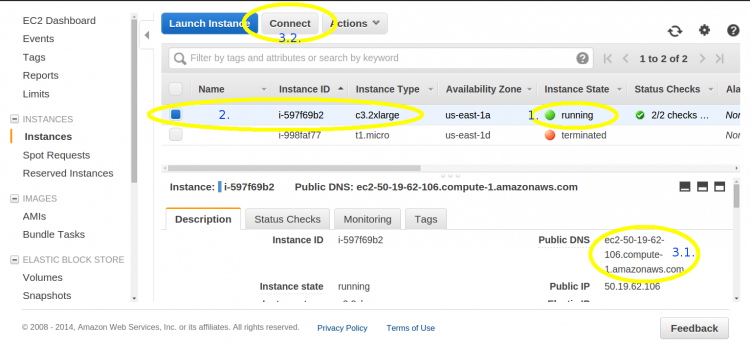
- Locate your instance
- Wait until your instance indicates
running - Select your instance (it will be highlighted in blue)
- Connect to your instance
- You can connect in a couple of ways:
- Via a standalone SSH client
- Connect using
ssh -i pathToYourKey/yourKey.pem ubuntu@yourPublicDNS- Fill in your key and DNS appropriately
- Connect using
- Via Java SSH Client through the browser
- Click the
Connectbutton at the top of the page - A new window should pop up, in that window:
- Select
A Java SSH Client directly from my browser (Java required) - Enter
ubuntuin theUser namefieldubuntuis the default user in our AMI. GotCloud and example data are stored in the ubuntu user's home directory
- Enter the path to the private key (including the .pem filename) in the
Private key pathfield - Click the
Launch SSH Clientbutton
- This will start a terminal on your instance.
- Select
- Click the
- Via a standalone SSH client
- You can connect in a couple of ways:
- Wait until your instance indicates
- You should now have terminal/command-line access to your instance and can run GotCloud from there.
- The ubuntu home directory has 2 subdirectories
- example - contains the data for the demo
- gotcloud - contains the gotcloud program and source
- Type
gotcloudfrom any directory followed by the desired command-line parameters in order to run GotCloud - You can try the GotCloud: Amazon Demo if you would like to test GotCloud
- The ubuntu home directory has 2 subdirectories
