GotCloud: Amazon Demo
Back to GotCloud
Back to GotCloud: Amazon
Introduction
This Amazon demo runs through the GotCloud SNP and INDEL calling pipelines.
The data used for this demo is originally from our sequencing workshop demos. We also have alignment and structural variation demos.
Links to the general GotCloud Demos (originally from our sequencing workshop):
- SeqShop: Sequence Mapping and Assembly Practical
- SeqShop: Variant Calling and Filtering for SNPs Practical
- SeqShop: Variant Calling and Filtering for INDELs Practical
- SeqShop: Analysis of Structural Variation Practical
To run this Demo on an Amazon Cluster rather than on a single node, see: StarCluster -> Run GotCloud Demo Using StarCluster
Starting up a Node
See Amazon Single Node for instructions on starting a node and getting a terminal running.
- For the demo, we recommend using a
c3.2xlargeinstance.
Running the Demo on Already Running Node
Examine the Setup
- After logging into the Amazon node as the ubuntu user, you should by default be in the ubuntu home directory:
/home/ubuntu- You can check this by doing:
pwd
- This should output:
/home/ubuntu
- Take a look at the contents of the ubuntu user home directory
ls
- This should output be 2 directories,
exampleandgotcloud- The
exampledirectory contains the files for this demo - The
gotclouddirectory contains the gotcloud programs and pre-compiled source
- The
- You can check this by doing:
- Look at the example input files:
ls example

bam.listcontains the list of BAM files per samplebamsis a subdirectory containing the BAM files for this demotest.bedcontains the region we want to process in this demo- To make the demo run faster, we only want to process a small region of chromosome 22. This file tells GotCloud the region. The region we are using is the APOL1 region
test.confcontains the settings we want GotCloud to use for this run
- For the demo, we want to tell GotCloud:
- The list of bams to use:
BAM_LIST = example/bam.list - The region to process rather than the whole genome:
UNIFORM_TARGET_BED = example/test.bed - The chromosomes to process. The default chromosomes are 1-22 & X, but we only want to process chromosome 22:
CHRS = 22
- The list of bams to use:
- For the demo, we want to tell GotCloud:


Run GotCloud SnpCall
Now that we have examined the instance files, run GotCloud snpcall
gotcloud snpcall --conf example/test.conf --outdir output --numjobs 8
- The ubuntu user is setup to have the gotcloud program and tools in its path, so you can just type the program name and it will be found
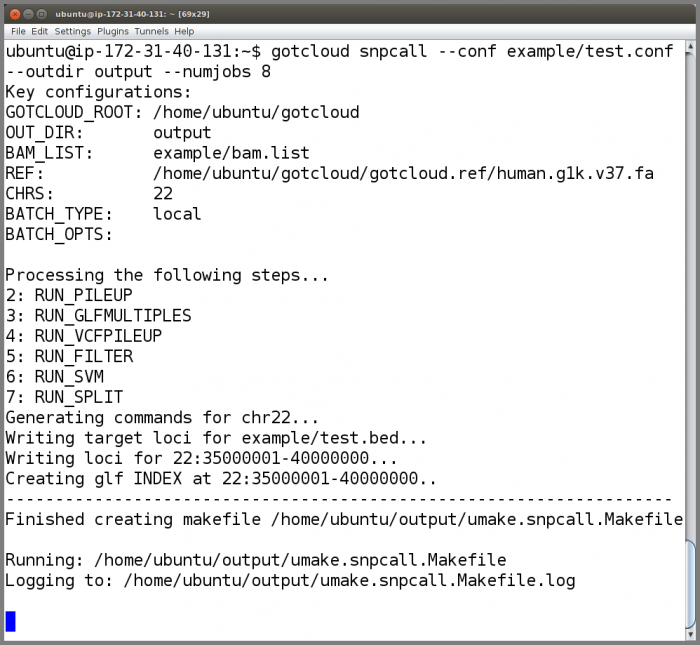
- This will take a few minutes to run.
- GotCloud first generates a makefile, and then runs the makefile
- After a while GotCloud snpcall will print some messages to the screen. This is expected and ok.
- When complete, GotCloud snpcall will indicate success/failure


Examining SnpCall Output
- ls on the ubuntu home directory to see the new output directory:
ls

- Look inside the output directory:
ls output

glfs- intermediate per sample genotype likelihood filesjobfiles- empty; was used to store commands as GotCloud was runningpvcfs- intermediate vcfs with per sample informationsplit- contains per chromosome directories with vcfs containing PASS only snps split up as required for beagle (part of ldrefine)target- contains the bed with the region to be processedumake.snpcall.conf- file containing all of the configuration settings used for this run of GotCloudumake.snpcall.Makefile- Makefile containing commands for this run of GotCloudumake.snpcall.Makefile.cluster- Makefile log of start/stop times of various stepsumake.snpcall.Makefile.log- log of the GotCloud runvcfs- contains per chromosome directories with vcfs- important output is
- filtered.vcf.gz file:
vcfs/chr22/chr22.filtered.vcf.gz - summary information:
vcfs/chr22/chr22.filtered.sites.vcf.summary
- filtered.vcf.gz file:
- important output is
- Look at the filtered file.
zless -S output/vcfs/chr22/chr22.filtered.vcf.gz
- Scroll down some:
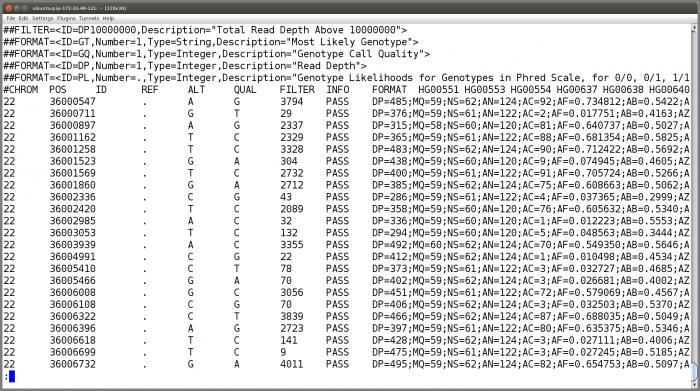
- Check that GotCloud found the expected SNP at 22:36661906
tabix output/vcfs/chr22/chr22.filtered.vcf.gz 22:36661906 |head -1
- Look at the summary information
cat output/vcfs/chr22/chr22.filtered.sites.vcf.summary
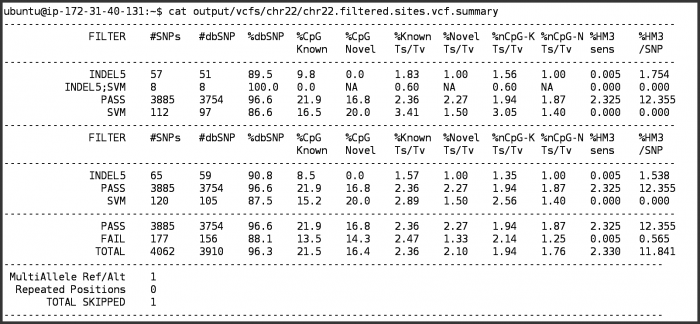
- To understand how to interpret the filtering summary statistics, please refer to Understanding vcf-summary output


Run GotCloud Indel
Now that we have examined the instance files, run GotCloud indel
gotcloud indel --conf example/test.conf --outdir output --numjobs 8
- The ubuntu user is setup to have the gotcloud program and tools in its path, so you can just type the program name and it will be found
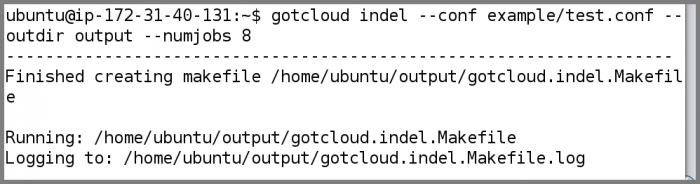
- This will take a few minutes to run.
- GotCloud first generates a makefile, and then runs the makefile
- When complete, GotCloud indel will indicate success/failure


Examining Indel Output
- Look inside the output directory to see the new indel directories:
ls output

aux- intermediate indel filesfinal- final output of Indel pipelineindelvcf- intermediate indel filesgotcloud.indel.conf- file containing all of the configuration settings used for this run of GotCloudgotcloud.indel.Makefile- Makefile containing commands for this run of GotCloudgotcloud.indel.Makefile.log- log of the GotCloud run
- Important Indel output is in
output/finalls output/final/

- Look at the final Indel VCF file.
zless output/final/all.genotypes.vcf.gz
- Scroll down some: [[File::IndelLess.png|900px]]
- Check that GotCloud found the expected Indel at 22:36662041
tabix output/final/all.genotypes.vcf.gz 22:36662041-36662041|less -S


Exit & Terminate
Prior to terminating, make sure you copy any data off of the root EBS volume attached to the instance as it will be deleted when you terminate.
- Exit from your terminal
- Terminate your Amazon Instance
- Right click on the instance you want to terminate in the EC2 dashboard
- Select Terminate
- Select "Yes, Terminate" to indicate you would like to terminate and the storage will be deleted.