Difference between revisions of "SeqShop: Aligning Your Own Genome, December 2014"
| Line 21: | Line 21: | ||
</div> | </div> | ||
| − | == | + | == Locating your FASTQs == |
| − | + | Your FASTQ files are under <code>~/Sample*/fastqs</code> directory. | |
| − | Your FASTQ files are under | + | * ''or <code>~/NA12878/fastqs</code>'' |
Look at your directory: | Look at your directory: | ||
| − | ls ~/ | + | ls ~/Sample*/fastqs |
| + | or | ||
| + | ls ~/NA12878/fastqs | ||
* <code>ls</code> does a directory listing | * <code>ls</code> does a directory listing | ||
* <code>~/</code> means to start from your home/base directory | * <code>~/</code> means to start from your home/base directory | ||
** Using ~/ means the command will work even if you have changed directories | ** Using ~/ means the command will work even if you have changed directories | ||
| − | You | + | You will see 2 files: |
| − | * | + | * Sample_R1.fastq.gz - 1st in pair |
| + | * Sample_R2.fastq.gz - 2nd in pair | ||
| − | What | + | == What did I do to run the alignment? == |
| − | + | === Created FASTQ_LIST file === | |
| − | * | + | I created a FASTQ_LIST file with the sample #s and fastqs. |
| − | ** | + | * What columns do we need in our file that tells GotCloud about our FASTQ? |
| + | ** SAMPLE | ||
| + | ** FASTQ1 | ||
| + | ** FASTQ2 | ||
| + | |||
| + | SAMPLE FASTQ1 FASTQ2 | ||
| + | Sample# /path/to/Sample#/fastqs/Sample#_R1.fastq.gz /path/to/Sample#/fastqs/Sample#_R2.fastq.gz | ||
| − | + | You can see what your fastq.list looks like | |
| − | + | * I took out the full path since I ran alignment in a different path: | |
| − | You | + | cat ~/Sample*/fastq.list |
| − | |||
| − | |||
| − | |||
| − | |||
| − | |||
| − | |||
| − | |||
| − | |||
| − | |||
| − | |||
| − | |||
| − | |||
| − | |||
| − | |||
| − | |||
| − | |||
| − | |||
| − | |||
| − | |||
| − | |||
| − | |||
| − | |||
| − | * | ||
| − | |||
| − | |||
| − | |||
| − | |||
| − | |||
| − | |||
| − | |||
| − | |||
| − | |||
| − | |||
| − | |||
| − | |||
| − | |||
| − | |||
| − | |||
| − | |||
| − | |||
| − | |||
| − | |||
| − | |||
| − | |||
| − | |||
| − | |||
| − | |||
| − | |||
| − | |||
| − | |||
| − | |||
| − | |||
| − | |||
| − | |||
| − | |||
| − | |||
| − | |||
| − | |||
| − | |||
| − | |||
| − | |||
| − | |||
| − | |||
| − | |||
| − | |||
| − | |||
| − | |||
| − | |||
| − | |||
| − | |||
| − | |||
| − | |||
| − | |||
| − | |||
| − | |||
| − | |||
| − | |||
| − | |||
| − | |||
| − | |||
| − | |||
| − | |||
| − | |||
| − | |||
| − | |||
| − | |||
| − | |||
| − | |||
| − | |||
| − | |||
| − | |||
| − | |||
| − | |||
| − | |||
| − | |||
| − | |||
| − | |||
| − | |||
| − | |||
| − | |||
| − | |||
| − | |||
| − | |||
| − | |||
| − | |||
| − | |||
| − | |||
| − | |||
| − | |||
| − | |||
| − | |||
| − | |||
| − | |||
| − | |||
| − | |||
| − | |||
| − | |||
| − | |||
| − | |||
| − | |||
| − | |||
| − | |||
| − | |||
| − | |||
| − | |||
| − | |||
| − | |||
| − | |||
| − | |||
| − | |||
| − | |||
| − | |||
| − | |||
| − | |||
| − | |||
| − | |||
| − | |||
| − | |||
| − | |||
| − | |||
| − | |||
| − | |||
| − | |||
| − | |||
| − | |||
| − | * | ||
| − | |||
| − | |||
| − | |||
| − | |||
| − | |||
| − | |||
| − | |||
| − | |||
| − | |||
| − | |||
| − | |||
| − | |||
| − | |||
| − | |||
| − | |||
| − | |||
| − | |||
| − | |||
| − | |||
== Create your GotCloud Configuration File == | == Create your GotCloud Configuration File == | ||
Revision as of 21:52, 7 December 2014
Viewing Genetic Info
Slides on risks of viewing genetic information
Goals of This Session
Learn how to go from your FASTQ files to generate Aligned BAMs.
- Your samples have already been aligned, so we will review the steps that were done
- Workshop computers don't have enough compute to align everyone's samples during the workshop
- You will get to take home both the original FASTQs and the aligned BAMs on a USB drive
- You will get it by the end of the week if not before - it takes a while to copy 74G-111G
- 4 samples will get "modified" BAMs so both FASTQ & BAM would fit on the drive
- "binned" qualities, duplicates & unmapped reads removed
- In future all generated BAMs will be automatically binned
- "binned" qualities, duplicates & unmapped reads removed
- Those that didn't get sequenced will get a drive with NA12878 public sample on it
Login instructions for seqshop-server
Login to the seqshop-server Linux Machine
This section will appear redundantly in each session. If you are already logged in or know how to log in to the server, please skip this section
- Login to the windows machine
- The username/password for the Windows machine should be written on the right-hand monitor
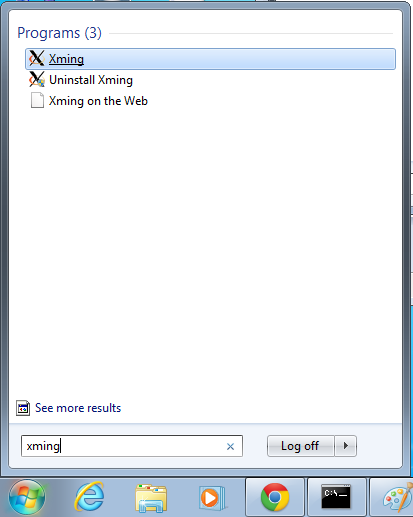
- Start xming so you can open external windows on our Linux machine
- Start->Enter "Xming" in the search and select "Xming" from the program list
- Nothing will happen, but Xming was started.
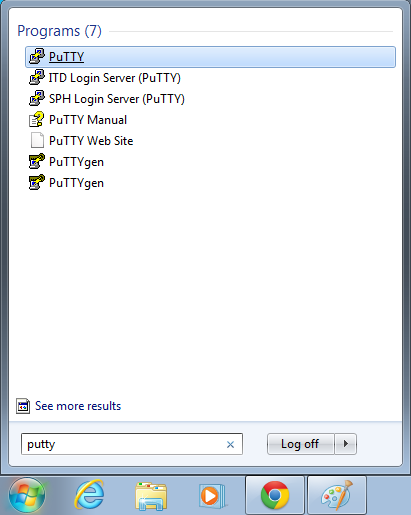
- Open putty
- Start->Enter "putty" in the search and select "PuTTY" from the program list
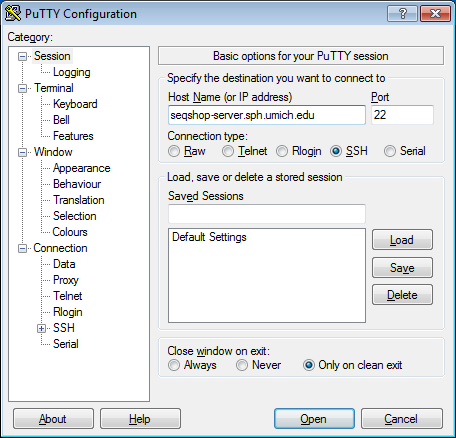
- Configure PuTTY in the PuTTY Configuration window
- Host Name:
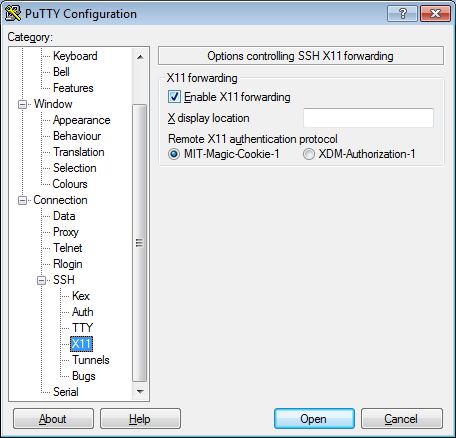
seqshop-server.sph.umich.edu - Setup to allow you to open external windows:
- In the left pannel: Connection->SSH->X11
- Add a check mark in the box next to
Enable X11 forwarding - Click
Open - If it prompts about a key, click
OK - Enter your provided username & password as provided
You should now be logged into a terminal on the seqshop-server and be able to access the test files.
- If you need another terminal, repeat from step 3.
Login to the seqshop Machine
So you can each run multiple jobs at once, we will have you run on 4 different machines within our seqshop setup.
- You can only access these machines after logging onto seqshop-server
3 users logon to:
ssh -X seqshop1
3 users logon to:
ssh -X seqshop2
2 users logon to:
ssh -X seqshop3
2 users logon to:
ssh -X seqshop4
Locating your FASTQs
Your FASTQ files are under ~/Sample*/fastqs directory.
- or
~/NA12878/fastqs
Look at your directory:
ls ~/Sample*/fastqs
or
ls ~/NA12878/fastqs
lsdoes a directory listing~/means to start from your home/base directory- Using ~/ means the command will work even if you have changed directories
You will see 2 files:
- Sample_R1.fastq.gz - 1st in pair
- Sample_R2.fastq.gz - 2nd in pair
What did I do to run the alignment?
Created FASTQ_LIST file
I created a FASTQ_LIST file with the sample #s and fastqs.
- What columns do we need in our file that tells GotCloud about our FASTQ?
- SAMPLE
- FASTQ1
- FASTQ2
SAMPLE   FASTQ1                                        FASTQ2
Sample#  /path/to/Sample#/fastqs/Sample#_R1.fastq.gz    /path/to/Sample#/fastqs/Sample#_R2.fastq.gz
You can see what your fastq.list looks like
- I took out the full path since I ran alignment in a different path:
cat ~/Sample*/fastq.list
Create your GotCloud Configuration File
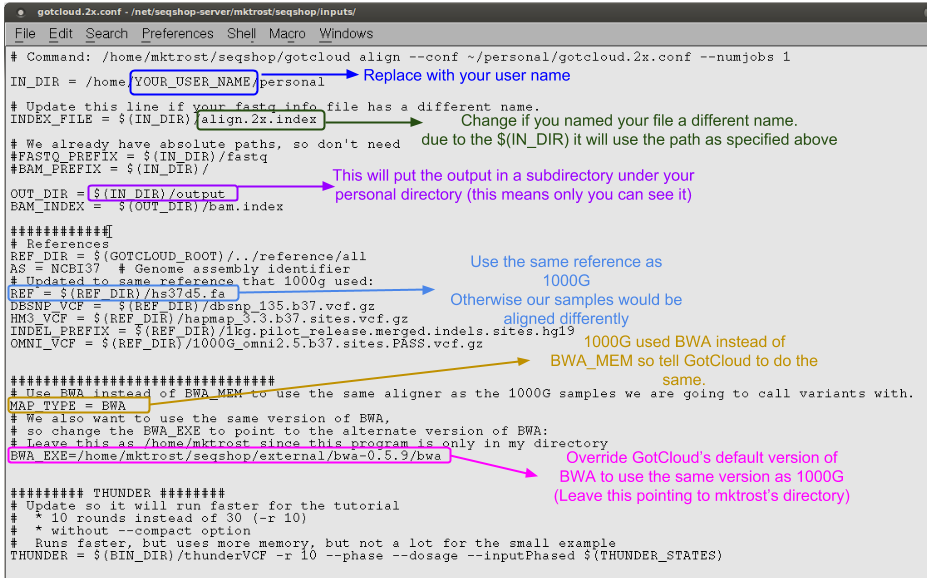
Now that you have your FASTQ info file created, we need to setup the configuration.
If you updated your gotcloud.2x.conf file yesterday, you still need to do this step
- We updated a few settings to match 1000g
- Updated the version of the genome reference
- Updated to use BWA instead of BWA_MEM
- Updated the version of BWA
You can copy from my directory to your personal directory:
cp /home/mktrost/seqshop/inputs/gotcloud.2x.conf ~/personal/.
You need to update the conf file to find your align.2x.index and ensure your output directory is setup.
nedit ~/personal/gotcloud.2x.conf &
(or use your favorite editor)
- Change the
IN_DIRline, replacingYOUR_USER_NAMEwith your user name. - Everything else is configured already.
You'll notice that this file is very similar to the one we have been using.
- Just a few modifications to run a new test on the whole genome
Run your Alignment
Screen
The alignment pipeline will run overnight, but you'll want to log out.
- How do I leave something running on the server even if I log out?
- One solution is screen!
- How do I use screen?
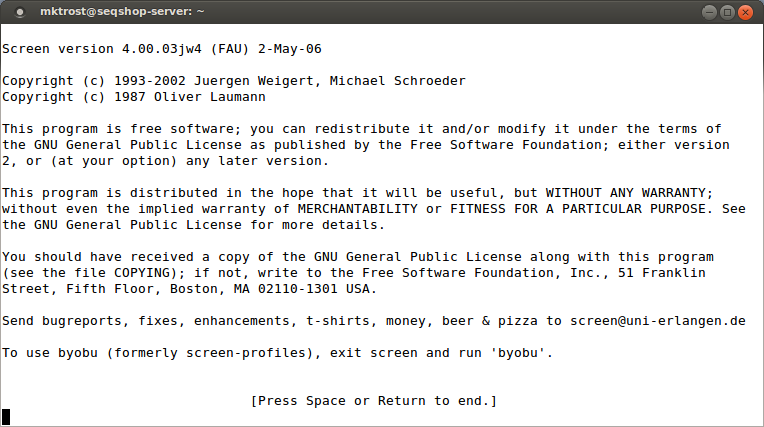
- Before running your command, you need to start screen:
screen
As it says, press Space or Return.
- It should now look basically the same as your normal command line.
You can now start your alignment:
/home/mktrost/seqshop/gotcloud/gotcloud align --conf ~/personal/gotcloud.2x.conf --numjobs 1
Yes, leave that as /home/mktrost/seqshop/gotcloud/gotcloud - that is where gotcloud is installed. The ~/... points GotCloud to your specific configuration file.
You should now see your alignment running:
- Want to log out and leave your job running?
In the screen window, type:
Ctrl-a d
(Hold down Ctrl and type 'a', let go of both and type 'd')
- This will "detach" from your screen session while your alignment continues to run.
- How do you log back into screen tomorrow?
screen -r
This will resume an already running screen.
- Feel free to test it out and you will see your alignment still running
- Just use Ctrl-a d to detach from screen and leave your job running
- Scrolling problems?
- If you want to scroll and screen doesn't scroll like you normally would?
- Type Ctrl-a Esc and you should be able to scroll up with your mouse wheel
- Or at least that is what I do from my Linux machine - (sorry I'm typing this up/testing these commands from Linux and not windows, so can't test it out)
- Type Ctrl-a Esc and you should be able to scroll up with your mouse wheel
Log Out
If you have not detached from screen:
Ctrl-a d
exit PuTTY
FEEDBACK!
Since I didn't send this out yesterday, today's survey has feedback for Tuesday & Wednesday. https://docs.google.com/forms/d/1qaLHq9w1Ib3FZq0CtlrbK_-breNiqGRV06oRYNmUuME/viewform
