Difference between revisions of "SeqShop: Estimates of Genetic Ancestry Practical, December 2014"
| Line 212: | Line 212: | ||
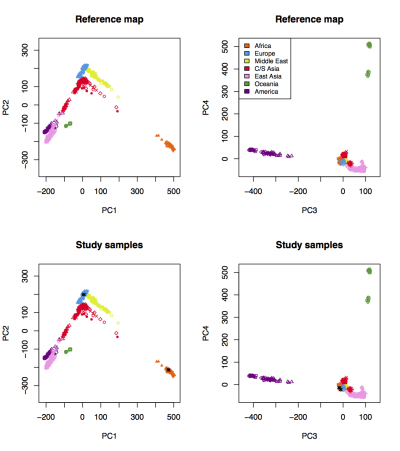
We expect to see the following figure, in which 3 CEU samples cluster with HGDP Europeans and 3 YRI samples cluster with HGDP Africans: | We expect to see the following figure, in which 3 CEU samples cluster with HGDP Europeans and 3 YRI samples cluster with HGDP Africans: | ||
[[File:Results_on_HGDP.png|thumb|center|alt=LASER results|400px|LASER results]] | [[File:Results_on_HGDP.png|thumb|center|alt=LASER results|400px|LASER results]] | ||
| + | |||
| + | |||
| + | == Restarting SNP Call on your own Genome == | ||
| + | Go to [[SeqShop: Calling Your Own Genome, December 2014]] so we can rerun SNP calling overnight. | ||
Revision as of 20:08, 10 December 2014
Introduction
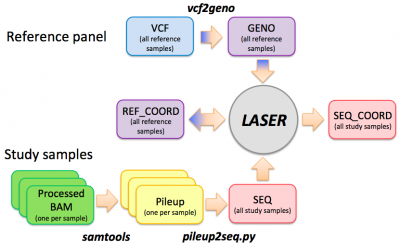
See the tutorial slides for an introduction of the LASER analysis workflow, input/output file formats, and usage of the LASER software.
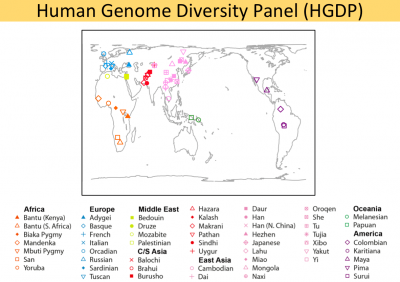
The main purpose of this page is to provide step-by-step command lines for using LASER to estimate ancestry of 6 targeted sequenced samples (2 HapMap trios) in a principal component space generated using genome-wide SNP data from the Human Genome Diversity Project (HGDP). The HGDP reference panel contains genotype data across 632,958 autosomal loci for 938 individuals from 53 populations worldwide.
For more details about the options and usage of LASER, please read the manual.
LASER workflow
HGDP reference panel
Setup in person at the SeqShop Workshop
This section is specifically for the SeqShop Workshop computers.
If you are not running during the SeqShop Workshop, please skip this section.
Login to the seqshop-server Linux Machine
This section will appear redundantly in each session. If you are already logged in or know how to log in to the server, please skip this section
- Login to the windows machine
- The username/password for the Windows machine should be written on the right-hand monitor
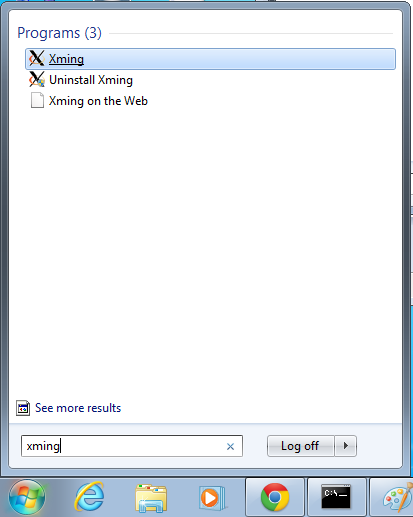
- Start xming so you can open external windows on our Linux machine
- Start->Enter "Xming" in the search and select "Xming" from the program list
- Nothing will happen, but Xming was started.
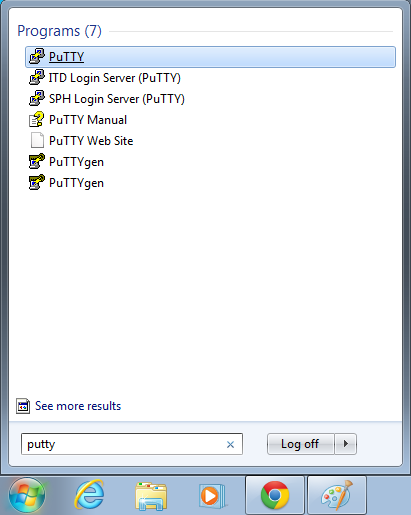
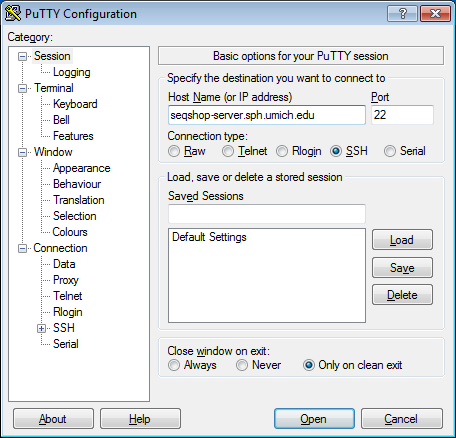
- Open putty
- Start->Enter "putty" in the search and select "PuTTY" from the program list
- Configure PuTTY in the PuTTY Configuration window
- Host Name:
seqshop-server.sph.umich.edu - Setup to allow you to open external windows:
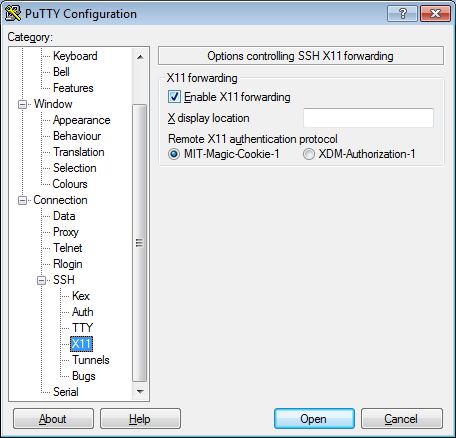
- In the left pannel: Connection->SSH->X11
- Add a check mark in the box next to
Enable X11 forwarding - Click
Open - If it prompts about a key, click
OK - Enter your provided username & password as provided
You should now be logged into a terminal on the seqshop-server and be able to access the test files.
- If you need another terminal, repeat from step 3.
Login to the seqshop Machine
So you can each run multiple jobs at once, we will have you run on 4 different machines within our seqshop setup.
- You can only access these machines after logging onto seqshop-server
3 users logon to:
ssh -X seqshop1
3 users logon to:
ssh -X seqshop2
2 users logon to:
ssh -X seqshop3
2 users logon to:
ssh -X seqshop4
Setup your run environment
This is the same setup you did for the previous tutorial, but you need to redo it each time you log in.
This will setup some environment variables to point you to
- Tutorial input files
source /home/chaolong/LASER-Tutorial/setup.txt
- You won't see any output after running
source- It silently sets up your environment
What is in the setup.txt file:
export GC=/home/mktrost/seqshop/gotcloud
export REF=/home/mktrost/seqshop/gotcloud/gotcloud.ref
export HGDP=/home/chaolong/LASER-Tutorial/HGDP
export BAM=/home/chaolong/LASER-Tutorial/BAM
export LASER=/home/chaolong/LASER-Tutorial/LASER-2.01
Point to where you want the output to go replacing the path with where you would like your output to go
export OUT=~/seqshop_output/
Setup when running on your own outside of the SeqShop Workshop
This section is specifically for running on your own outside of the SeqShop Workshop.
If you are running during the SeqShop Workshop, please skip this section.
This tutorial uses samtools from GotCloud, as well as example data downloaded in the Sequence Mapping & Assembly tutorial, so if you have not already installed GotCloud and the tutorial data in a previous tutorial, please do so now: Tutorial Setup
Setup your run environment
Environment variables will be used throughout the tutorial.
We recommend that you setup these variables so you won't have to modify every command in the tutorial.
- Point to where you installed GotCloud
- Point to where you installed the seqshop files
- Point to where you want the output to go
- Using bash (replace the paths below with the appropriate paths):
export GC=~/seqshop/gotcloud
export SS=~/seqshop/example
export OUT=~/seqshop/output
- Using tcsh (replace the paths below with the appropriate paths):
setenv GC ~/seqshop/gotcloud
setenv SS ~/seqshop/example
setenv OUT ~/seqshop/output
- Additional variables for Ancestry:
- Using bash (replace the paths below with the appropriate paths):
export REF=$SS/ancestry/ref
export HGDP=$SS/ancestry/HGDP
export BAM=$SS/ancestry/bams
- Using tcsh (replace the paths below with the appropriate paths):
setenv REF $SS/ancestry/ref
setenv HGDP $SS/ancestry/HGDP
setenv BAM $SS/ancestry/bams
Getting started
Create a working directory:
mkdir $OUT/ancestry
cd $OUT/ancestry
Download and decompress software package:
wget http://www.sph.umich.edu/csg/chaolong/LASER/LASER-2.01.tar.gz
tar xzvf LASER-2.01.tar.gz
Preparing input files for LASER
Step 0: vcf --> geno
This step prepares the reference panel by converting a VCF genotype file to a GENO file. We will skip this step and use a ready-to-use HGDP reference panel. A typical command to run the vcf2geno tool is given in the file "./LASER-2.01/vcf2geno/cmd.sh":
# cd ./LASER-2.01/vcf2geno/
# ./vcf2geno --inVcf exampleVCF/example.vcf.gz --updateID test.updateId --out test
Step 1: bam --> pileup
This step uses samtools to generate pileup files from bam files.
In person at workshop notes:
- Please only try one sample so that we won't overload the sever with everyone running 6 jobs at the same time. Pileup files for these 6 samples have been prepared for later steps.
- It takes about 2 mins for each pileup job.
Outside of the workshop notes:
- The BAMs provided as part of the download are chr22 only BAMs. They are used to demonstrate how to run this step.
- Pileup files for the whole genome BAMs are provided with the download and will be used in the next step.
- You only need to try one of these.
  $GC/bin/samtools mpileup -q 30 -Q 20 -f $REF/human.g1k.v37.fa -l $HGDP/HGDP_938.bed $BAM/121101035.recal.bam > 121101035.recal.pileup
# $GC/bin/samtools mpileup -q 30 -Q 20 -f $REF/human.g1k.v37.fa -l $HGDP/HGDP_938.bed $BAM/121101043.recal.bam > 121101043.recal.pileup
# $GC/bin/samtools mpileup -q 30 -Q 20 -f $REF/human.g1k.v37.fa -l $HGDP/HGDP_938.bed $BAM/121101050.recal.bam > 121101050.recal.pileup
# $GC/bin/samtools mpileup -q 30 -Q 20 -f $REF/human.g1k.v37.fa -l $HGDP/HGDP_938.bed $BAM/121101052.recal.bam > 121101052.recal.pileup
# $GC/bin/samtools mpileup -q 30 -Q 20 -f $REF/human.g1k.v37.fa -l $HGDP/HGDP_938.bed $BAM/121101415.recal.bam > 121101415.recal.pileup
# $GC/bin/samtools mpileup -q 30 -Q 20 -f $REF/human.g1k.v37.fa -l $HGDP/HGDP_938.bed $BAM/121101861.recal.bam > 121101861.recal.pileup
We use -q 30 and -Q 20 to exclude reads that have mapping quality score lower than 30 or base quality score lower than 20.
Step 2: pileup --> seq
In this step, we will generate a file called "hapmap_trios.seq", containing the information of 6 samples. It takes about 30 seconds to run. We will use the pre-generated pileup files in the $BAM folder.
- These pre-generated pileup files are for the whole genome of all 6 samples
python $LASER/pileup2seq/pileup2seq.py \
-m $HGDP/HGDP_938.site \
-b $BAM/AMD_roi_1-based.bed \
-i $BAM/AMD_hapmap_trios_id.txt \
-o hapmap_trios \
$BAM/121101035.recal.pileup \
$BAM/121101043.recal.pileup \
$BAM/121101050.recal.pileup \
$BAM/121101052.recal.pileup \
$BAM/121101415.recal.pileup \
$BAM/121101861.recal.pileup
In the above command, -b provides the targeted regions to exclude and -i specifies alternative IDs for the BAM files to be used in the .seq file (including popID and indivID). -b and -i are optional.
Estimating ancestry coordinates
Step 0: Generate the reference ancestry space
LASER can perform principal components analysis (PCA) on genotype data of the reference panel to generate a reference ancestry space.
# $LASER/laser -g $HGDP/HGDP_938.geno -pca 1 -k 30 -o HGDP_938
The above command takes ~20 minutes to finish. We will skip this step, and use a set of reference ancestry coordinates that have been generated in the file $HGDP/HGDP_938.RefPC.coord. View the reference coordinates:
less -S $HGDP/HGDP_938.RefPC.coord
Step 1: Estimate ancestry for sequenced samples
Submit two jobs to place sequenced samples into the reference ancestry space:
$LASER/laser -g $HGDP/HGDP_938.geno -c $HGDP/HGDP_938.RefPC.coord -s hapmap_trios.seq -K 20 -k 4 -x 1 -y 3 -o hapmap_trios.1-3 &
$LASER/laser -g $HGDP/HGDP_938.geno -c $HGDP/HGDP_938.RefPC.coord -s hapmap_trios.seq -K 20 -k 4 -x 4 -y 6 -o hapmap_trios.4-6 &
The first job will process samples 1 to 3 and the second job will processed samples 4 to 6. Each sequenced sample will be projected from a 20-dimensional PCA space onto a 4-dimensional reference ancestry space. The running time is ~10 minutes for processing 3 samples in each job.
Step 2: Combine results
Results from previous step will be output to two files "hapmap_trios.1-3.SeqPC.coord" and "hapmap_trios.4-6.SeqPC.coord". Here we simply concatenate the two files while skipping the header line of the second file.
cp hapmap_trios.1-3.SeqPC.coord hapmap_trios.SeqPC.coord
more +2 hapmap_trios.4-6.SeqPC.coord >> hapmap_trios.SeqPC.coord
View the results:
less -S hapmap_trios.SeqPC.coord
The results should look like below (results will vary slightly):
popID  indivID  L1      Ci         K     t          PC1        PC2         PC3         PC4
YRI    NA19238  78386   0.170864   20    0.999688   467.989    -210.294    -14.1729    -14.4204
CEU    NA12892  85486   0.185973   20    0.999723   10.796     199.095     -9.90387    -21.4534
CEU    NA12891  87588   0.190442   20    0.99973    2.04224    196.07      -19.5705    -12.8022
CEU    NA12878  83213   0.181748   20    0.999711   4.34591    199.861     -12.4825    -22.6281
YRI    NA19239  87564   0.193424   20    0.999734   474.464    -215.96     -9.02921    -19.7372
YRI    NA19240  95866   0.213874   20    0.999748   469.914    -214.94     -14.9923    -13.6559
Visualizing results
Example R codes are available in ./LASER-2.01/plot/. Let's copy the folder to current working directory:
cp -r $LASER/plot/ ./
Go to the plot folder and run the script to plot results:
cd plot
Rscript plotHGDP.r $HGDP/HGDP_938.RefPC.coord ../hapmap_trios.SeqPC.coord
A figure named "Results_on_HGDP.pdf" will be generated. Visualize the figure:
evince Results_on_HGDP.pdf &
We expect to see the following figure, in which 3 CEU samples cluster with HGDP Europeans and 3 YRI samples cluster with HGDP Africans:
Restarting SNP Call on your own Genome
Go to SeqShop: Calling Your Own Genome, December 2014 so we can rerun SNP calling overnight.
