Difference between revisions of "SeqShop: Variant Calling and Filtering for SNPs Practical, June 2014"
| Line 5: | Line 5: | ||
** How to examine the variants at particular genomic positions | ** How to examine the variants at particular genomic positions | ||
** How to evaluate the quality of SNP calls | ** How to evaluate the quality of SNP calls | ||
| − | |||
| − | |||
| − | |||
| − | |||
| − | |||
| − | |||
| − | |||
| − | |||
| − | |||
| − | |||
| − | |||
| − | |||
| − | |||
| − | |||
| − | |||
| − | |||
| − | |||
| − | |||
| − | |||
| − | |||
{{SeqShopLogin}} | {{SeqShopLogin}} | ||
| − | == Setup your run environment == | + | == Setup your run environment== |
| − | This will setup some environment variables to point you to | + | This is the same setup you did for the previous tutorial, but you need to redo it each time you log in. It will setup some environment variables to point you to: |
| + | * GotCloud program | ||
| + | * Tutorial input files | ||
| + | * Setup an output directory | ||
| + | ** It will leave your output directory from the previous tutorial in tact. | ||
source /home/mktrost/seqshop/setup.txt | source /home/mktrost/seqshop/setup.txt | ||
| − | + | * You won't see any output after running <code>source</code> | |
| − | + | ** It silently sets up your environment | |
| − | + | <div class="mw-collapsible mw-collapsed" style="width:200px"> | |
| − | + | View setup.txt | |
| − | + | <div class="mw-collapsible-content"> | |
| − | + | [[File:setup.png|500px]] | |
| + | </div> | ||
| + | </div> | ||
== Examining GotCloud SnpCall Input files == | == Examining GotCloud SnpCall Input files == | ||
=== Sequnce Alignment Files: BAM Files === | === Sequnce Alignment Files: BAM Files === | ||
| + | |||
=== Reference Files === | === Reference Files === | ||
| + | Reference files can be downloaded with GotCloud or from other sources | ||
| + | * See [[GotCloud: Genetic Reference and Resource Files]] for more information on downloading/generating reference files | ||
| + | |||
| + | For GotCloud snpcall, you need: | ||
| + | # Reference genome FASTA file | ||
| + | #* Contains the reference base for each position of each chromosome | ||
| + | #* Additional information on the FASTA format: http://en.wikipedia.org/wiki/FASTA_format | ||
| + | # VCF (variant call format) files with chromosomes/positions | ||
| + | #* dbsnp - used to skip known variants when recalibrating | ||
| + | #* hapmap - used for sample contamination/sample swap validation | ||
| + | #* | ||
| + | |||
=== GotCloud BAM Index File === | === GotCloud BAM Index File === | ||
| Line 53: | Line 52: | ||
== Run GotCloud SnpCall == | == Run GotCloud SnpCall == | ||
| + | [[File:SnpcallDiagram.png|500px]] | ||
| + | |||
Now that we have all of our input files, we need just a simple command to run: | Now that we have all of our input files, we need just a simple command to run: | ||
${GC}/gotcloud/gotcloud snpcall --conf ${GC}/inputs/gotcloud.conf --numjobs 4 --region 22:36000000-37000000 | ${GC}/gotcloud/gotcloud snpcall --conf ${GC}/inputs/gotcloud.conf --numjobs 4 --region 22:36000000-37000000 | ||
Revision as of 23:25, 14 June 2014
Goals of This Session
- What we want to learn
- How to generate filtered variant calls for SNPs from BAMs
- Basic variant call file format (VCF)
- How to examine the variants at particular genomic positions
- How to evaluate the quality of SNP calls
Login to the seqshop-server Linux Machine
This section will appear redundantly in each session. If you are already logged in or know how to log in to the server, please skip this section
- Login to the windows machine
- The username/password for the Windows machine should be written on the right-hand monitor
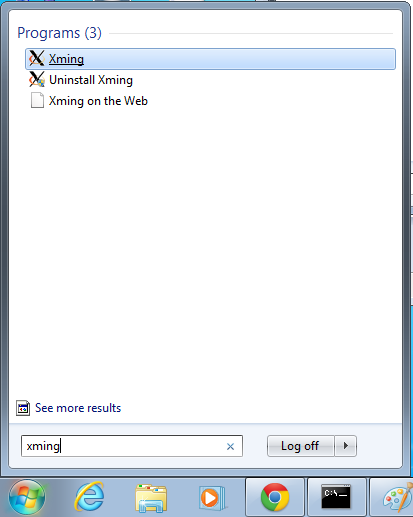
- Start xming so you can open external windows on our Linux machine
- Start->Enter "Xming" in the search and select "Xming" from the program list
- Nothing will happen, but Xming was started.
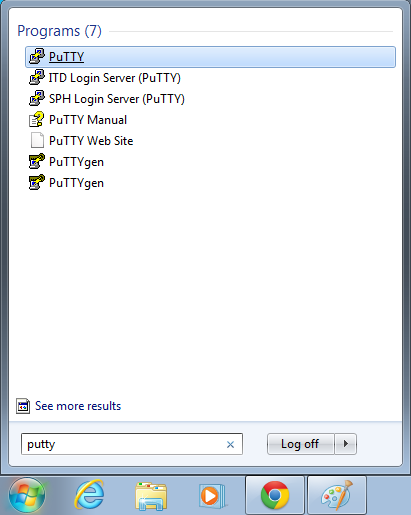
- Open putty
- Start->Enter "putty" in the search and select "PuTTY" from the program list
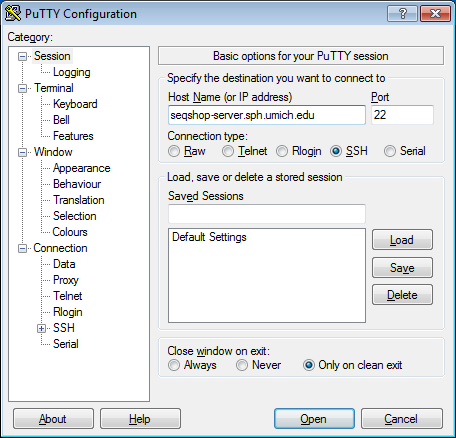
- Configure PuTTY in the PuTTY Configuration window
- Host Name:
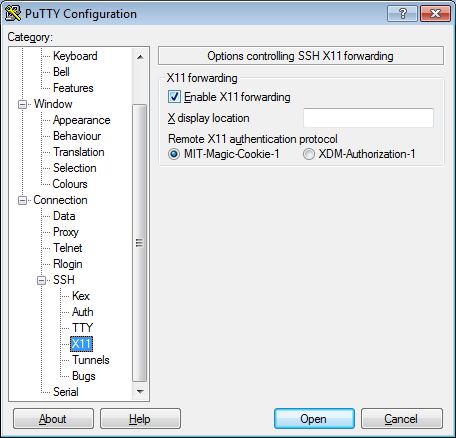
seqshop-server.sph.umich.edu - Setup to allow you to open external windows:
- In the left pannel: Connection->SSH->X11
- Add a check mark in the box next to
Enable X11 forwarding - Click
Open - If it prompts about a key, click
OK - Enter your provided username & password as provided
You should now be logged into a terminal on the seqshop-server and be able to access the test files.
- If you need another terminal, repeat from step 3.
Login to the seqshop Machine
So you can each run multiple jobs at once, we will have you run on 4 different machines within our seqshop setup.
- You can only access these machines after logging onto seqshop-server
3 users logon to:
ssh -X seqshop1
3 users logon to:
ssh -X seqshop2
2 users logon to:
ssh -X seqshop3
2 users logon to:
ssh -X seqshop4
Setup your run environment
This is the same setup you did for the previous tutorial, but you need to redo it each time you log in. It will setup some environment variables to point you to:
- GotCloud program
- Tutorial input files
- Setup an output directory
- It will leave your output directory from the previous tutorial in tact.
source /home/mktrost/seqshop/setup.txt
- You won't see any output after running
source- It silently sets up your environment
Examining GotCloud SnpCall Input files
Sequnce Alignment Files: BAM Files
Reference Files
Reference files can be downloaded with GotCloud or from other sources
- See GotCloud: Genetic Reference and Resource Files for more information on downloading/generating reference files
For GotCloud snpcall, you need:
- Reference genome FASTA file
- Contains the reference base for each position of each chromosome
- Additional information on the FASTA format: http://en.wikipedia.org/wiki/FASTA_format
- VCF (variant call format) files with chromosomes/positions
- dbsnp - used to skip known variants when recalibrating
- hapmap - used for sample contamination/sample swap validation
GotCloud BAM Index File
GotCloud Configuration File
We will use the same configuration file as we used yesterday in GotCloud Align.
Run GotCloud SnpCall
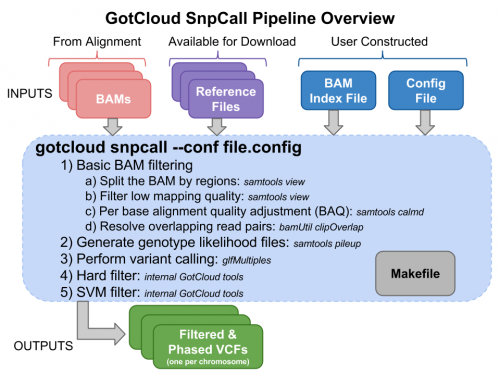
Now that we have all of our input files, we need just a simple command to run:
${GC}/gotcloud/gotcloud snpcall --conf ${GC}/inputs/gotcloud.conf --numjobs 4 --region 22:36000000-37000000
- --numjobs tells GotCloud how many jobs to run in parallel
- Depends on your system
- --region 22:36000000-37000000
- The sample files are just a small region of chromosome 22, so to save time, we tell Gotcloud to ignore the other regions
This should take about 5 minutes to run.
It should end with a line like: TBD
If you cancelled GotCloud part way through, just rerun your GotCloud command and it will pick up where it left off.
Examining GotCloud SnpCall Output
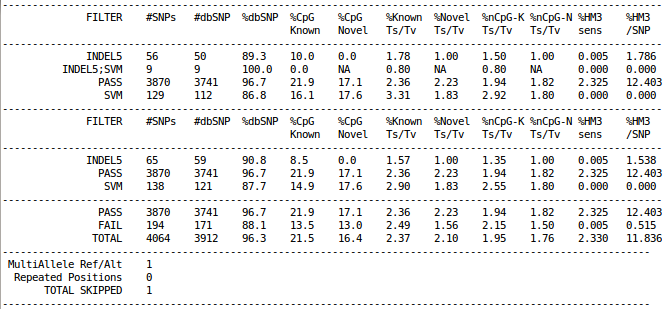
Filtering Summary Statistics
cat ${OUTPUT}/vcfs/chr22/chr22.filtered.sites.vcf.summary
GotCloud Genotype Refinement
seqshop/gotcloud/gotcloud beagle --conf seqshop/inputs/gotcloud.conf --numjobs 2 --region 22:36000000-37000000
