Difference between revisions of "SeqShop: Analysis of Structural Variation Practical, June 2014"
| Line 330: | Line 330: | ||
== What does a real SV look like? == | == What does a real SV look like? == | ||
| − | + | samtools tview does not provide a good way to visualize structural variants due to limited resolution to show large-scale variants. | |
| + | |||
| + | IGV provides a good alternative way to visualize structural variants as shown in the xample below. | ||
<div class="mw-collapsible mw-collapsed" style="width:600px"> | <div class="mw-collapsible mw-collapsed" style="width:600px"> | ||
Revision as of 01:12, 18 June 2014
(WARNING: Under Construction)
Goals of This Session
- What we want to learn is calling large deletions using GenomeSTRiP implemented in GotCloud pipeline
- How to prepare metadata for running GenomeSTRiP.
- How to perform variant discovery and filtering for large deletions
- How to perform genotyping for large deletions
- How to perform variant discovery and filtering from third party sites.
Login to the seqshop-server Linux Machine
This section will appear redundantly in each session. If you are already logged in or know how to log in to the server, please skip this section
- Login to the windows machine
- The username/password for the Windows machine should be written on the right-hand monitor
- Start xming so you can open external windows on our Linux machine
- Start->Enter "Xming" in the search and select "Xming" from the program list
- Nothing will happen, but Xming was started.
- View Screenshot
- Open putty
- Start->Enter "putty" in the search and select "PuTTY" from the program list
- View Screenshot
- Configure PuTTY in the PuTTY Configuration window
- Host Name:
seqshop-server.sph.umich.edu - View Screenshot
- Setup to allow you to open external windows:
- In the left pannel: Connection->SSH->X11
- Add a check mark in the box next to
Enable X11 forwarding - View Screenshot
- Click
Open - If it prompts about a key, click
OK - Enter your provided username & password as provided


You should now be logged into a terminal on the seqshop-server and be able to access the test files.
- If you need another terminal, repeat from step 3.
Login to the seqshop Machine
So you can each run multiple jobs at once, we will have you run on 4 different machines within our seqshop setup.
- You can only access these machines after logging onto seqshop-server
3 users logon to:
ssh -X seqshop1
3 users logon to:
ssh -X seqshop2
2 users logon to:
ssh -X seqshop3
2 users logon to:
ssh -X seqshop4
Setup your run environment
This is a slightly different setup from what you did for the previous tutorial, but you need to redo it each time you log in. It will setup some environment variables to point you to:
- GotCloud program
- Tutorial input files
- Setup an output directory
- It will leave your output directory from the previous tutorial in tact.
source /home/hmkang/seqshop/setup.txt
- You won't see any output after running
source- It silently sets up your environment
- If you want to view the detail of the set up, type
less /home/hmkang/seqshop/setup.txt
and press 'q' to finish.
View setup.txt
export GC=/home/hmkang/seqshop/gotcloud
export IN=/home/hmkang/seqshop/inputs
export REF=/home/hmkang/seqshop/reference/chr22
export VTREF=/home/hmkang/seqshop/reference/vtRef
export SV=/home/hmkang/seqshop/reference/svtoolkit
export EXT=/home/hmkang/seqshop/external
export OUT=~/out
mkdir -p ${OUT}
Do you notice what the differences were?
Examining GotCloud/GenomeSTRiP Input files
Sequnce Alignment Files: BAM Files and Index Files
The GotCloud Indel caller takes the same inputs as GotCloud snpcall.
- BAMs->SVs rather than BAMs->SNPs
If you want a reminder, of what they look like, here is a link to the previous tutorial : GotCloud SnpCall Input Files
If you want to check if you still have the bam index file, run
head $OUT/bam.index
- View Results
HG00641	ALL	/net/seqshop-server/hmkang/out/bams/HG00641.recal.bam
HG00640	ALL	/net/seqshop-server/hmkang/out/bams/HG00640.recal.bam
HG00551	ALL	/net/seqshop-server/hmkang/out/bams/HG00551.recal.bam
HG00553	ALL	/net/seqshop-server/hmkang/out/bams/HG00553.recal.bam
HG00554	ALL	bams/HG00554.recal.bam
HG00637	ALL	bams/HG00637.recal.bam
HG00638	ALL	bams/HG00638.recal.bam
HG00734	ALL	bams/HG00734.recal.bam
HG00736	ALL	bams/HG00736.recal.bam
HG00737	ALL	bams/HG00737.recal.bam
Also, make sure that you have only 62 samples (you did not append new files twice)
wc -l $OUT/bam.index
62 /net/seqshop-server/hmkang/out/bam.index
Reference Files
Reference files can be downloaded with GotCloud or from other sources.
- For this practical, I already downloaded them for you.
- See GotCloud: Genetic Reference and Resource Files for more information on downloading/generating reference files
Similar to SNP and Indel calling, you need
- Reference genome FASTA file
For running GenomeSTRiP, you additionally need:
- Masked FASTA file to exclude hard-to-align regions
- PloidyMap file indicating the regions of genomes with unusual ploidy (e.g. chrX, chrY)
We looked at them yesterday, but you can take another look at the chromosome 22 reference files included for this tutorial:
ls $REF
- View Results
1000G_omni2.5.b37.sites.PASS.chr22.vcf.gz             hapmap_3.3.b37.sites.chr22.vcf.gz.tbi  human.g1k.v37.chr22.fa.bwt
1000G_omni2.5.b37.sites.PASS.chr22.vcf.gz.tbi         human.g1k.v37.chr22-bs.umfa            human.g1k.v37.chr22.fa.fai
1kg.pilot_release.merged.indels.sites.hg19.chr22.vcf  human.g1k.v37.chr22.dict               human.g1k.v37.chr22.fa.pac
dbsnp_135.b37.chr22.vcf.gz                            human.g1k.v37.chr22.fa                 human.g1k.v37.chr22.fa.sa
dbsnp_135.b37.chr22.vcf.gz.tbi                        human.g1k.v37.chr22.fa.amb             human.g1k.v37.chr22.winsize100.gc
hapmap_3.3.b37.sites.chr22.vcf.gz                     human.g1k.v37.chr22.fa.ann
Additional reference and parameters
ls $SV/ref
- View Results
human_g1k_v37.chr22.mask.100.fasta human_g1k_v37.chr22.mask.100.fasta.dict human_g1k_v37.chr22.mask.100.fasta.fai
ls $SV/conf
- View Results
genstrip_parameters.txt humgen_g1k_v37_ploidy.chr22.map humgen_g1k_v37_ploidy.map
GotCloud Configuration File
We will use a slightly modified version of configuration file as we used yesterday in GotCloud Align.
See SeqShop: Alignment: GotCloud Configuration File for more details
- Note we want to limit snpcall to just chr22 so the configuration already has
CHRS = 22(default was 1-22 & X).
For more information on configuration, see: GotCloud snpcall: Configuration File
- Contains information on how to configure for exome/targeted sequencing
Check out what was changed.
cat $IN/gotcloud.conf
- View Results
IN_DIR = $(GOTCLOUD_ROOT)/../inputs

INDEX_FILE = $(IN_DIR)/align.index
FASTQ_PREFIX = $(IN_DIR)/fastq
BAM_PREFIX = $(IN_DIR)/

OUT_DIR = out
BAM_INDEX =  $(OUT_DIR)/bam.index

############
# References
REF_DIR = $(GOTCLOUD_ROOT)/../reference/chr22
AS = NCBI37  # Genome assembly identifier
REF = $(REF_DIR)/human.g1k.v37.chr22.fa
DBSNP_VCF =  $(REF_DIR)/dbsnp_135.b37.chr22.vcf.gz
HM3_VCF = $(REF_DIR)/hapmap_3.3.b37.sites.chr22.vcf.gz
INDEL_PREFIX = $(REF_DIR)/1kg.pilot_release.merged.indels.sites.hg19
OMNI_VCF = $(REF_DIR)/1000G_omni2.5.b37.sites.PASS.chr22.vcf.gz

MAP_TYPE = BWA_MEM

###############
CHRS = 22

######### THUNDER ########
# Update so it will run faster for the tutorial
#  * 10 rounds instead of 30 (-r 10)
#  * without --compact option
#  Runs faster, but uses more memory, but not a lot for the small example
THUNDER = $(BIN_DIR)/thunderVCF -r 10 --phase --dosage --inputPhased $(THUNDER_STATES)

##############################
## GenomeSTRIP
#############################
GENOMESTRIP_SVTOOLKIT_DIR = $(GOTCLOUD_ROOT)/../reference/svtoolkit
GENOMESTRIP_MASK_FASTA = $(GENOMESTRIP_SVTOOLKIT_DIR)/ref/human_g1k_v37.chr22.mask.100.fasta
GENOMESTRIP_PLOIDY_MAP = $(GENOMESTRIP_SVTOOLKIT_DIR)/conf/humgen_g1k_v37_ploidy.chr22.map
GENOMESTRIP_PARAM = $(GENOMESTRIP_SVTOOLKIT_DIR)/conf/genstrip_parameters.txt
Before starting... a few 'why' questions..
Why use GenomeSTRiP?
- GenomeSTRiP is a mature software for detecting and genotyping large deletions (and duplications soon to be implemented). In 1000 Genomes, GenomeSTRiP showed near best performance in most evaluation metrics.
- GenomeSTRiP is a great tool to integrate across multiple structural variant calls. When multiple structural variant calls exists, all the other variants can be genotyped and filtered with GenomeSTRiP, and that is how 1000 Genomes structural variant call sets were made.
Why do we use GotCloud/GenomeSTRiP pipeline instead of directly using GenomeSTRiP itself?
- The main purpose of GotCloud pipelines is to provide a pipeline for users with limited knowledge and experience with high performance computing environment.
- Although GenomeSTRiP provides a reasonably straightforward pipeline, it still requires a detailed understanding of GATK framework and the details of parameter.
- GotCloud aims to provide more simpler way to run these procedure
- GotCloud supports a variety of cluster environment that is not currently supported by GenomeSTRiP
- GenomeSTRiP is designed based on a framework called Qscript, which provide a nice support for LSF cluster system, but it does not support many other cluster enviroments such as MOSIX or SLURM we use locally.
- GotCloud also provide a fault-tolerant solution for large-scale jobs.
- GotCloud automatically picks up jobs from the point where it failed. This allows easier and simpler run against potential technical glitches in the system.
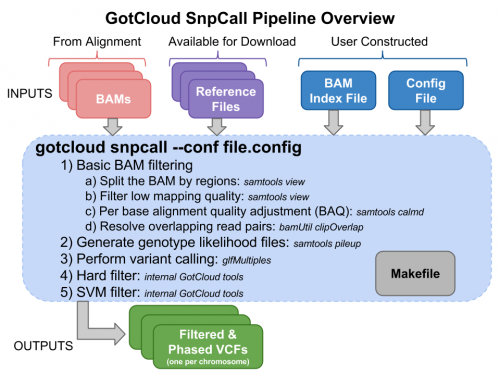
Overview of GotCloud/GenomeSTRiP pipeline
GotCloud/GenomeSTRiP pipeline consists of three separate steps.
- Preprocess step : Create metadata summarizing the GC profiles, depth distribution, insert size distribution for accurate discovery and genotyping of structural variants.
- Discovery step : Perform variant discovery split by region, across all samples. Also, perform variant filtering based on expert knowledge.
- Genotyping step : Iterate discovered variants across the samples and calculate the genotype likelihood of for each possible genotype.
In addition, if one wants to genotype structural variants from other structural variant caller, there is a step available.
- Third-party Genotyping and Filtering step : Perform genotyping on the variant sites specified by an input VCF, and also perform variant filtering.
Running GotCloud/GenomeSTRiP Metadata Pipeline
We first need to create metadata summarizing genome-wide statistics such as GC profiles, depth distribution, insert size distributions.
In principle, the metadata can be created from the input BAM files by running the following command
time perl $GC/bin/genomestrip.pl -run-metadata --out $OUT/sv --conf $IN/gotcloud.conf --numjobs 2
Wait!!! Do not run this, because it will take ~50 minutes to finish. Instead, let's look what the output would have looked like.
ls $IN/metadata
cpt depth depth.dat gcprofile gcprofiles.zip genome_sizes.txt isd isd.dist.bin spans spans.dat
The directory contains metadata output and other intermediate files produced by "GenomeSTRiP SVProcess" step.
See [[1]] for the details of the Preprocess step.
NOTE: You don't always have to create the metadata on your own. You can in principle use the public metadata generated for 1000G samples, under the assumption that the metadata share similar characteristics to your samples. But if you have enough computing resources, the best practice is to create metadata specifically for your sequence daat.
Running GotCloud/GenomeSTRiP Discovery Pipeline
To discover large deletions from the 62 BAMs we are using for this workshop, you can run the following command
time perl $GC/bin/genomestrip.pl -run-discovery --metadata $IN/metadata --out $OUT/sv --conf $IN/gotcloud.conf --region 22:36000000-37000000 --numjobs 2
This will take ~2 minutes to finish.
Let's see the final outputs produced.
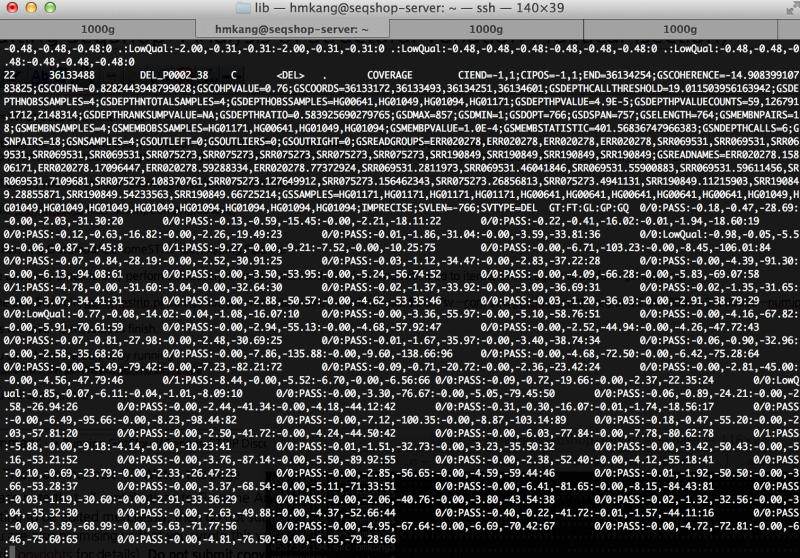
less $OUT/sv/discovery/discovery.vcf
You will see output file that looks like this

How many variants are filtered out?
Run the following command to see filtering statistics.
grep -v ^# $OUT/sv/discovery/discovery.vcf | cut -f 7 | sort | uniq -c
You will see the following output
     7 COHERENCE;COVERAGE;DEPTH;DEPTHPVAL
    17 COHERENCE;COVERAGE;DEPTH;DEPTHPVAL;PAIRSPERSAMPLE
     3 COHERENCE;COVERAGE;DEPTH;PAIRSPERSAMPLE
     2 COHERENCE;COVERAGE;DEPTHPVAL;PAIRSPERSAMPLE
     1 COHERENCE;COVERAGE;PAIRSPERSAMPLE
     3 COVERAGE
     1 COVERAGE;DEPTH
    67 COVERAGE;DEPTH;DEPTHPVAL
   270 COVERAGE;DEPTH;DEPTHPVAL;PAIRSPERSAMPLE
     2 COVERAGE;DEPTH;PAIRSPERSAMPLE
     4 COVERAGE;DEPTHPVAL
     5 COVERAGE;DEPTHPVAL;PAIRSPERSAMPLE
     5 COVERAGE;PAIRSPERSAMPLE
What does it mean? There is no "PASS filter" variants! This is because the metadata was created from only a small fraction of genome (with very unusual distribution of depth across chr22!). If whole-genome metadata was used, the results will look more reasonable, and you will have some "PASS" variants. Trust me!
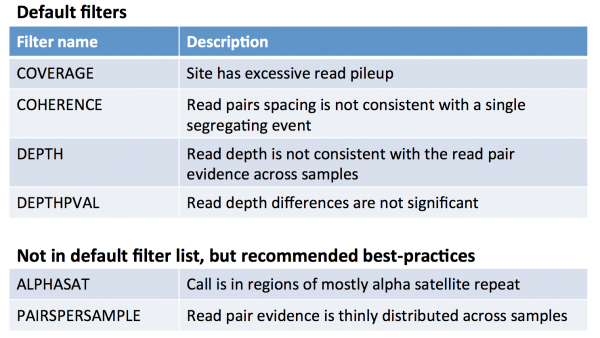
What does each filter mean?
Probably the most useful documentation of GenomeSTRiP is the powerpoint presentation available at http://www.broadinstitute.org/software/genomestrip/sites/default/files/materials/GATKWorkshop_GenomeSTRiP_tutorial_Dec2012.pdf
In slide 27, you will see the following description of the filters

Running GotCloud/GenomeSTRiP Genotyping Pipeline
The discovery pipeline only performs discovery of variant sites with filtering. You will need to iterate BAMs again to perform genotyping.
time perl $GC/bin/genomestrip.pl -run-genotype --metadata $IN/metadata --out $OUT/sv --conf $IN/gotcloud.conf --region 22:36000000-37000000 --numjobs 4
This will take ~3 minutes to finish.
You can check the output by running
zless $OUT/sv/genotype/genotype.vcf.gz
You will see output similar to this
You will see the output with genotype information

Running GotCloud/GenomeSTRiP 3rd-party Site Genotyping/Filtering Pipeline
You can take a 3rd-party site and genotype with GenomeSTRiP. Here we take a 1000 Genomes phase 1 sites and genotype them.
time perl $GC/bin/genomestrip.pl -run-thirdparty --in-vcf $EXT/1kg.phase1.chr22.36Mb.sites.vcf --metadata $IN/metadata --out $OUT/sv --conf $IN/gotcloud.conf --region 22:36000000-37000000 --numjobs 4
This will take ~2 minutes to finish.
You can also check the output by running
zless $OUT/sv/thirdparty/genotype.vcf.gz
You will see the output with genotype information

What does a real SV look like?
samtools tview does not provide a good way to visualize structural variants due to limited resolution to show large-scale variants.
IGV provides a good alternative way to visualize structural variants as shown in the xample below.
Do you understand why this is a likely SV?

Run GotCloud SnpCall

Now that we have all of our input files, we need just a simple command to run:
 $GC/gotcloud snpcall --conf $IN/gotcloud.conf --numjobs 4 --region 22:36000000-37000000
- --numjobs tells GotCloud how many jobs to run in parallel
- Depends on your system
- --region 22:36000000-37000000
- The sample files are just a small region of chromosome 22, so to save time, we tell GotCloud to ignore the other regions
Curious if it started running properly? Check out this screenshot:

This should take about 5 minutes to run.
- After about 4 minutes of running, GotCloud snpcall will output some text to the screen. Don't worry, that is expected and is just output from some of the intermediate tools.
- It should end with a line like:
Commands finished in 289 secs with no errors reported
If you cancelled GotCloud part way through, just rerun your GotCloud command and it will pick up where it left off.
Examining GotCloud SnpCall Output
Let's look at the output directory:
ls $OUT
- Do you see any new files or directories?
- View Annotated Screenshot:

Let's look at the vcfs directory:
ls $OUT/vcfs
Just a chr22 directory, so look inside of there:
ls $OUT/vcfs/chr22
- Can you identify the final filtered VCF and the associated summary file?
- Answer & annotated directory listing:
- Filtered VCF (SVM & hard filters): chr22.filtered.vcf.gz
- Summary file: chr22.filtered.sites.vcf.summary

Now, let's look in the split directory for the VCF with just the passing variants:
ls $OUT/split/chr22
- Which file do you think is the one you want?
- Answer:
- chr22.filtered.PASS.vcf.gz

Filtering Summary Statistics
cat $OUT/vcfs/chr22/chr22.filtered.sites.vcf.summary
View Screenshot

To understand how to interpret the filtering summary statistics, please refer to Understanding vcf-summary output
Filtered VCF
Let's look at the filtered sites file.
less -S $OUT/vcfs/chr22/chr22.filtered.sites.vcf
- Scroll down until you find some variants.
- Use space bar to jump a full page
- Use down arrow to move down one line
- Scroll right: lots of info fields, but no per sample genotype information
- What is the first filtered out variant that you find & what filter did it fail?
- Answer:
- It failed SVM filter

Remember, use 'q' to exit out of less
q
Now, let's look at the filtered file with genotypes.
zless -S $OUT/vcfs/chr22/chr22.filtered.vcf.gz
- Scroll down until you find some variants.
- Use space bar to jump a full page
- Use down arrow to move down one line
- Scroll right until you should see per sample genotype information
- View annotated screenshot:

Passing SNPs
Let's look at the file of just the pass sites:
zless -S $OUT/split/chr22/chr22.filtered.PASS.vcf.gz
- Scroll down: they all look like they
PASS
Let's check if they are all PASS.
zcat $OUT/split/chr22/chr22.filtered.PASS.vcf.gz |grep -v "^#"| cut -f 7| grep -v "PASS"
It will return nothing since there are no non-passing variants in this file.
- Want an explanation of this command?
- zcat ...: uncompress the zipped VCF
- '|' : this takes the output of one command and sends it as input to the next
- grep -v "^#" : exclude any lines that start with "#" - headers
- cut -f 7 : extract the FILTER column (the 7th column)
- grep -v "PASS" : exclude any rows that have a "PASS" in the FILTER column
Compare that to the filtered file we looked at before:
zcat $OUT/vcfs/chr22/chr22.filtered.vcf.gz |grep -v "^#"| cut -f 7| grep -v "PASS"
- Do you see any filters?
- Answer
- Yes
- It should have scrolled and you should see filters like:
- INDEL5;SVM
- INDEL5
- SVM
- It should have scrolled and you should see filters like:
GotCloud Genotype Refinement
To improve the quality of the genotypes, we run a genotype refinement pipeline.
This pipeline runs Beagle & thunder.
Genotype Refinement Input
The GotCloud genotype refinement pipeline takes as input $OUT/split/chr22/chr22.filtered.PASS.vcf.gz (the VCF file of PASS'ing SNPs from snpcall.
The bam index and the configuration file we used for GotCloud snpcall will tell GotCloud genotype refinement everything it needs to know, so no new input files need to be prepared.
Note: the configuration file overrides the THUNDER command to make it go faster than the default settings so the tutorial will run faster:

Running GotCloud Genotype Refinement
Since everything is setup, just run the following command (very similar to snpcall).
$GC/gotcloud ldrefine --conf $IN/gotcloud.conf --numjobs 2 --region 22:36000000-37000000
- Beagle will take about 2-3 minutes to complete
- Thunder will automatically run and will take another 3-4 minutes
Genotype Refinement Output
- What's new in the output directory?
- Answer
beagledirectory : Beagle outputthunderdirectory : Thunder outputumake.beagle.conf: Configuration values used for GotCloud beagleumake.beagle.Makefile: GNU makefile for commands run as part of GotCloud beagleumake.beagle.Makefile.log: Log of the GotCloud beagle runumake.thunder.*files : Contain the configuration & steps used in GotCloud thunder
Let's take a look at that interesting location we found in the alignment tutorial : chromosome 22, positions 36907000-36907100
Use tabix to extract that from the VCFs:
$GC/bin/tabix $OUT/thunder/chr22/ALL/thunder/chr22.filtered.PASS.beagled.ALL.thunder.vcf.gz 22:36907000-36907100 |less -S
Remember, type 'q' to quit less.
q
- Are there any variants in this region?
- Answer:
- Yes!
- Positions:
36907001; Ref: T, Alt: C - that's what we saw before36907098; Ref: T, Alt: C - that's what we saw before
- What is HG00551's genotype at these positions?
- First check which sample number HG00551 is:
$GC/bin/tabix -H $OUT/thunder/chr22/ALL/thunder/chr22.filtered.PASS.beagled.ALL.thunder.vcf.gz
- That will help you figure out it's genotype.
- Rerun the tabix command and scroll to find HG00551's genotype:
$GC/bin/tabix $OUT/thunder/chr22/ALL/thunder/chr22.filtered.PASS.beagled.ALL.thunder.vcf.gz 22:36907000-36907100 |less -S
- Answer:
- It is the first sample
0|1: Heterozygous1|1; Homozygous Alt (C)
Remember, type 'q' to quit less.
q
Did I find interesting variants?
The region we selected contains APOL1 gene, which is known to play an important role in kidney diseases such as nephrotic syndrome. One of the non-synonymous risk allele, rs73885139 located at position 22:36661906 increases the risk of nephrotic syndrome by >2-folds. Let's see if we found the interesting variant by looking at the VCF file by position.
$GC/bin/tabix $OUT/vcfs/chr22/chr22.filtered.vcf.gz 22:36661906 | head -1
Did you see a variant at the position?