Difference between revisions of "Amazon Single Node"
From Genome Analysis Wiki
Jump to navigationJump to search| Line 23: | Line 23: | ||
##* For the Demo, we suggest <code>c3.2xlarge</code> | ##* For the Demo, we suggest <code>c3.2xlarge</code> | ||
## Click the <code>Review and Launch</code> button | ## Click the <code>Review and Launch</code> button | ||
| − | #:[[File:InstanceType1.png]] | + | ##* Optionally you can select <code>Next:Configure Instance Details</code> to additional steps |
| + | #:[[File:InstanceType1.png|750px]] | ||
| + | # Review Instance Launch | ||
| + | ## Make any updates you would like | ||
| + | ##* You can increase the default storage volume or add additional volumes by selecting <code>Edit storage</code> | ||
| + | ## When everything is as you like, click the <code>Launch</code> button | ||
| + | #:[[File:ReviewInstance1.png|750px]] | ||
Revision as of 17:23, 15 October 2014
Introduction
After creating an amazon account (https://aws.amazon.com/), you can start a machine on Amazon using the GotCloud AMI.
The GotCloud AMI contains:
- GotCloud
- Reference Files
- Demo, see GotCloud: Amazon Demo for instructions on running the demo.
Starting the GotCloud AMI
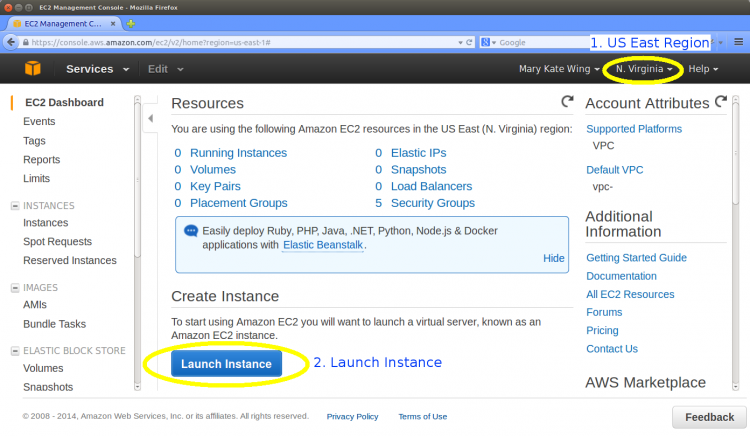
- Go to the EC2 Dashboard: https://console.aws.amazon.com/ec2/v2/home?region=us-east-1#
- If it is not already selected, select
N. Virginiafrom the dropdown menu in the upper right hand corner of the dashboard.- The GotCloud AMI is currently only in the
US East (N. Virginia)region, so be sure you are set to that.
- The GotCloud AMI is currently only in the
- Select the
Launch Instancebutton on the dashboard
- If it is not already selected, select
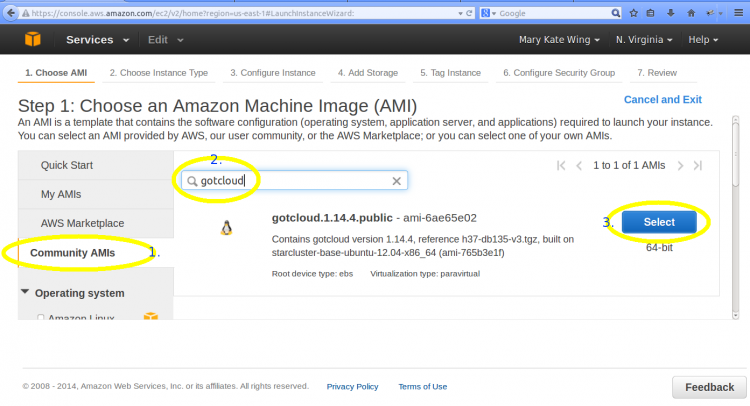
- Select the GotCloud AMI
- Select
Community AMIsfrom the left menu - Type
gotcloud(enter) in the search menu in order to see the GotCloud AMIs - Click the
Selectbutton on the most recent GotCloud AMI
- Select
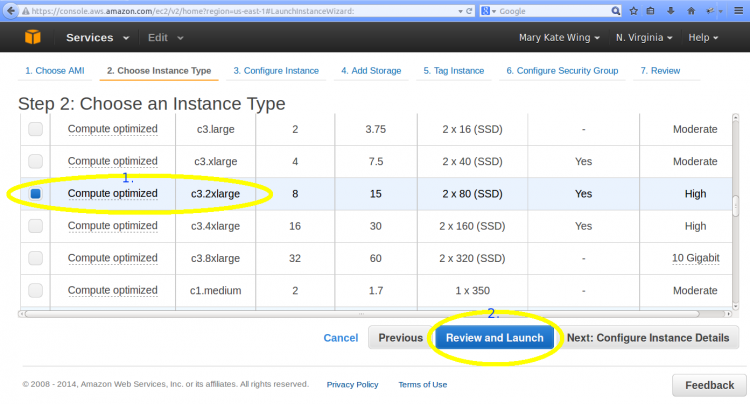
- Choose an Instance Type
- Select the Instance Type that you would like to run
- For the Demo, we suggest
c3.2xlarge
- For the Demo, we suggest
- Click the
Review and Launchbutton- Optionally you can select
Next:Configure Instance Detailsto additional steps
- Optionally you can select
- Select the Instance Type that you would like to run
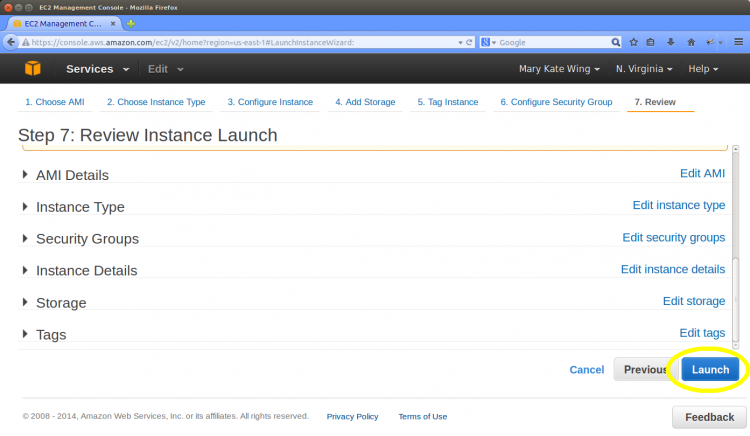
- Review Instance Launch
- Make any updates you would like
- You can increase the default storage volume or add additional volumes by selecting
Edit storage
- You can increase the default storage volume or add additional volumes by selecting
- When everything is as you like, click the
Launchbutton
- Make any updates you would like


