Difference between revisions of "SeqShop: Sequence Mapping and Assembly Practical, June 2014"
| Line 164: | Line 164: | ||
=== GotCloud FASTQ Index File === | === GotCloud FASTQ Index File === | ||
| − | + | The FASTQ index file is created by you to tell GotCloud about each of your FASTQ files: | |
| − | * | + | * Where to find it |
* Sample name | * Sample name | ||
** Each sample can have multiple FASTQs | ** Each sample can have multiple FASTQs | ||
** Each FASTQ is for a single sample | ** Each FASTQ is for a single sample | ||
| + | * Run identifier | ||
| + | ** For recalibration we need to know which reads were in the same run. | ||
| − | + | FASTQ Index Format: | |
| + | * Tab delimited | ||
| + | * Starts with a header line | ||
| + | * One line per single-end read | ||
| + | * One line per paired-end read (only 1 line per pair). | ||
| − | + | Let's look a look at the index file I prepared for this tutorial: | |
| − | + | less -S ${IN}/align.index | |
| − | |||
| − | |||
| − | |||
| + | ; Which samples had multiple Runs? | ||
| + | <ul> | ||
| + | <div class="mw-collapsible mw-collapsed" style="width:500px"> | ||
| + | <li>Need a reminder of the format?</li> | ||
| + | <div class="mw-collapsible-content"> | ||
| + | [[File:fqindex.png|650px]] | ||
| + | </div> | ||
| + | </div> | ||
| + | <div class="mw-collapsible mw-collapsed" style="width:500px"> | ||
| + | <li>Answer:</li> | ||
| + | <div class="mw-collapsible-content"> | ||
| + | <ul> | ||
| + | <li>HG00553 & HG00640</li> | ||
| + | <li>They have multiple unique values in the RGID field</li> | ||
| + | [[File:fqindexRG.png|650px]] | ||
| + | </div> | ||
| + | </div> | ||
| + | </ul> | ||
| + | </ul> | ||
| − | |||
| − | |||
| − | |||
| − | |||
| − | |||
| − | |||
| − | |||
| − | |||
| − | |||
| − | |||
| − | |||
| − | |||
| − | |||
| − | |||
| − | |||
| − | |||
| − | |||
| − | |||
| − | |||
| − | + | How do you point Gotcloud to your index file? | |
| − | + | * Command-line <code>--index_file</code> option | |
| − | + | : or | |
| − | + | * Configuration file <code>INDEX_FILE</code> setting. | |
| − | |||
| − | |||
| − | |||
| − | |||
| − | |||
| − | |||
| − | |||
| − | |||
| − | |||
| − | |||
| − | |||
| − | |||
| − | |||
| − | |||
| − | |||
| − | |||
| − | |||
| − | |||
| − | |||
| − | |||
| − | |||
| − | |||
| − | |||
| − | |||
| − | |||
| − | |||
| − | |||
| − | |||
| − | |||
| − | |||
| − | |||
| − | |||
| − | |||
| − | |||
| − | |||
| − | |||
| − | * | ||
| − | |||
| − | |||
| − | |||
| − | |||
| − | |||
| − | |||
| − | |||
| − | |||
| − | |||
| − | |||
The command-line setting takes precedence over the configuration file setting. | The command-line setting takes precedence over the configuration file setting. | ||
Revision as of 19:03, 14 June 2014
Introduction
See the introductory slides for an intro to this tutorial.
Goals of This Session
- What we want to learn
- Basic sequence data file formats (FASTQ, BAM)
- How to generate aligned sequences that are ready for variant calling from raw sequence reads
- How to evaluate the quality of sequence data
- How to visualize sequence data to examine the reads aligned to particular genomic positions
Login to the seqshop-server Linux Machine
This section will appear redundantly in each session. If you are already logged in or know how to log in to the server, please skip this section
- Login to the windows machine
- The username/password for the Windows machine should be written on the right-hand monitor
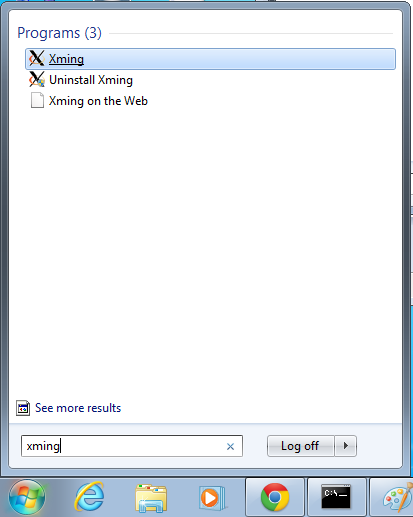
- Start xming so you can open external windows on our Linux machine
- Start->Enter "Xming" in the search and select "Xming" from the program list
- Nothing will happen, but Xming was started.
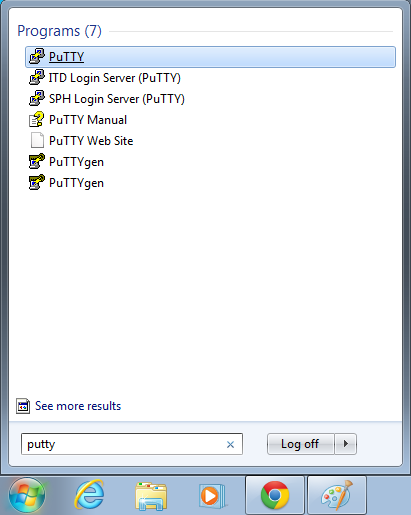
- Open putty
- Start->Enter "putty" in the search and select "PuTTY" from the program list
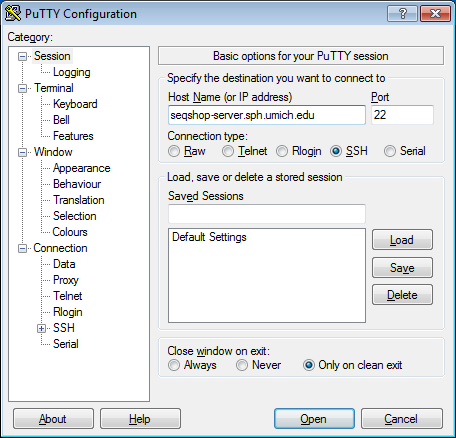
- Configure PuTTY in the PuTTY Configuration window
- Host Name:
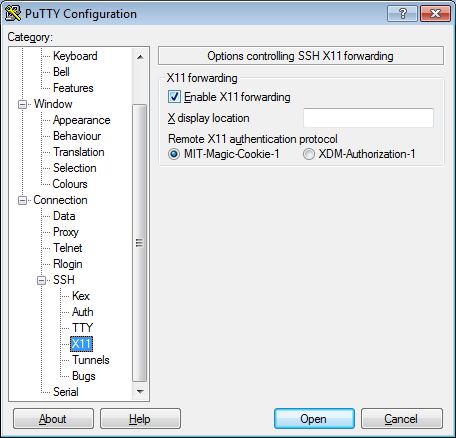
seqshop-server.sph.umich.edu - Setup to allow you to open external windows:
- In the left pannel: Connection->SSH->X11
- Add a check mark in the box next to
Enable X11 forwarding - Click
Open - If it prompts about a key, click
OK - Enter your provided username & password as provided
You should now be logged into a terminal on the seqshop-server and be able to access the test files.
- If you need another terminal, repeat from step 3.
Login to the seqshop Machine
So you can each run multiple jobs at once, we will have you run on 4 different machines within our seqshop setup.
- You can only access these machines after logging onto seqshop-server
3 users logon to:
ssh -X seqshop1
3 users logon to:
ssh -X seqshop2
2 users logon to:
ssh -X seqshop3
2 users logon to:
ssh -X seqshop4
Setup your run environment
This will setup some environment variables to point you to
- GotCloud program
- Tutorial input files
- Setup an output directory
source /home/mktrost/seqshop/setup.txt
Alternatively, if you would like to change the output directory, copy the file, make the modifications and source your own file:
cp /home/mktrost/seqshop/setup.txt ~/setup.txt
nedit ~/setup.txt
source ~/setup.txt
(You can use your favorite editor instead of nedit. I typically use emacs, but nedit is more like Windows.)
Examining Raw Sequence Reads
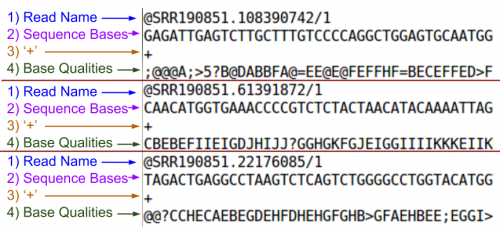
FASTQ : standard file format provided to you by those who did the sequencing.
- For more information on the FASTQ format, see: http://en.wikipedia.org/wiki/FASTQ_format
For this tutorial, we will use FASTQs for 4 1000 Genome samples
- Subset of FASTQs - should map to chromosome 22 36000000-37000000
ls ${IN}/fastq/
There are 24 fastq files: combination of single-end & paired-end.
- Can you tell which files are single-end and which are paired-end?
Look at a couple of FASTQs:
less -S ${IN}/fastq/HG00551.SRR190851_1.fastq
less is a Linux command that allows you to look at a file.
-Soption prevents line wrap.- Use the arrow (up/down/left/right) keys to scroll through the file.
- Use
zlessif the file is compressed.
Use 'q' to exit out of less
q
- Do you remember the parts of a FASTQ?
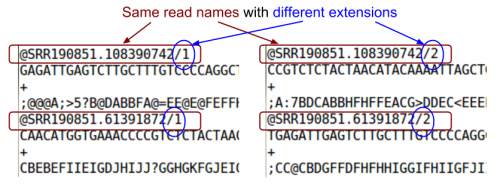
Look at the paired read:
less -S ${IN}/fastq/HG00551.SRR190851_2.fastq
- Do you notice something in common?
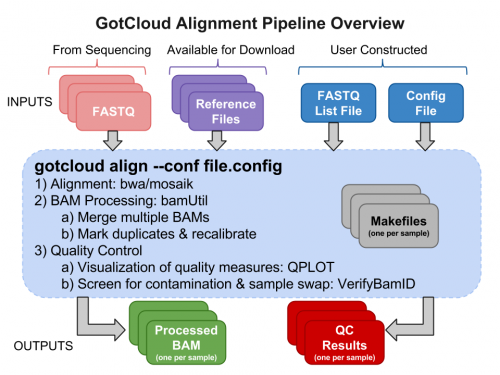
GotCloud Alignment Pipeline
Why GotCloud?
- Easy to learn & run
- All-in-one sequence analysis pipeline
- You don’t have to know the details of individual component
- Robust parallelization
- Automatic partition of multi-sample jobs
- Reliable and fault-tolerant parallelization via GNU make
- Restart from where it stopped upon unexpected crash
- Cloud & Cluster-friendly
- Supports multiple clusters such as MOSIX, Slurm, & SGE
- Amazon instances allow running large-scale jobs without having your own cluster
Sequence Processing Recommendations
- Be consistent within a project
- Process all samples with same pipeline
- Batch effect may arise if different pipelines are used due to pipeline differences
- Use the same configuration within a project
- Process all samples with same pipeline
Examining GotCloud Align Input Files
Sequence Data Files : FASTQs
We already looked at those in: Examining Raw Sequence Reads
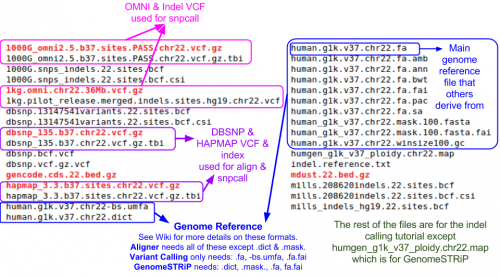
Reference Files
Reference files can be downloaded with GotCloud or from other sources
- See GotCloud: Genetic Reference and Resource Files for more information on downloading/generating reference files
For alignment, you need:
- Reference genome FASTA file
- Contains the reference base for each position of each chromosome
- Additional information on the FASTA format: http://en.wikipedia.org/wiki/FASTA_format
- VCF (variant call format) files with chromosomes/positions
- dbsnp - used to skip known variants when recalibrating
- hapmap - used for sample contamination/sample swap validation
Take a look at the chromosome 22 reference files included for this tutorial:
ls ${REF}
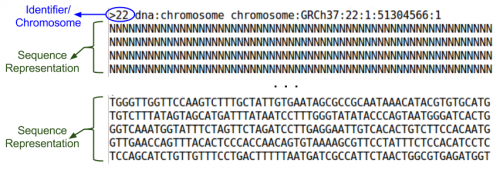
Let's read the reference FASTA file (all reference bases for the chromosome):
less ${REF}/human.g1k.v37.chr22.fa
- Where is the reference sequence?
GotCloud FASTQ Index File
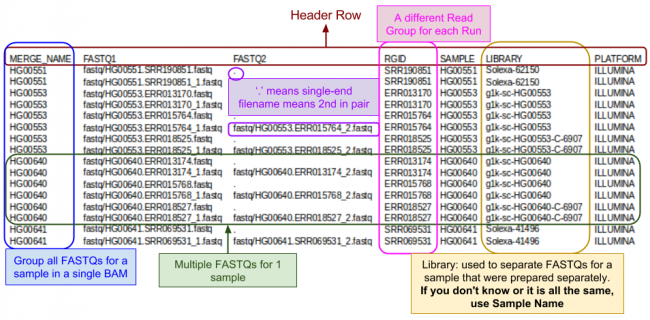
The FASTQ index file is created by you to tell GotCloud about each of your FASTQ files:
- Where to find it
- Sample name
- Each sample can have multiple FASTQs
- Each FASTQ is for a single sample
- Run identifier
- For recalibration we need to know which reads were in the same run.
FASTQ Index Format:
- Tab delimited
- Starts with a header line
- One line per single-end read
- One line per paired-end read (only 1 line per pair).
Let's look a look at the index file I prepared for this tutorial:
less -S ${IN}/align.index
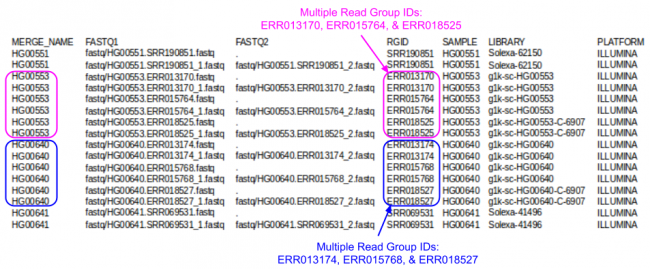
- Which samples had multiple Runs?
How do you point Gotcloud to your index file?
- Command-line
--index_fileoption
- or
- Configuration file
INDEX_FILEsetting.
The command-line setting takes precedence over the configuration file setting.
GotCloud Configuration File
This file is created by you to configure GotCloud for your data.
- Default values are provided in ${GC}/gotcloud/bin/gotcloudDefaults.conf
- Most values should be left as the defaults
- Specify values in your configuration file as:
KEY = value
- Use $(KEY) to refer to another key's value
- If a KEY is specified twice, the later value is used
- Does not have access to environment variables
- '#' indicates a comment
- Keys to override:
| Key Name | Description |
|---|---|
| Index File Settings - pointing GotCloud to your data | |
| INDEX_FILE | Path to the FASTQ index file that you created
|
| FASTQ_PREFIX | Prefix to be added to the FASTQ files in INDEX_FILE
|
| BAM_INDEX | Path to the BAM index file
|
| Reference File Settings - telling GotCloud where to find your reference files | |
| REF_DIR | Path to your reference files
|
| REF | Path/filename of the FASTA reference file
|
| DBSNP_VCF | Path/filename of the DBSNP file
|
| HM3_VCF | Path/filename of the HapMap3 file
|
| OMNI_VCF | Path/filename of the OMNI file
|
| INDEL_PREFIX | Path/filename base of the indels file
|
Let's look at the configuration file I created for this test:
more ${GC}/inputs/gotcloud.conf
It already points to your align file.
Run GotCloud Align
Now that we have all of our input files, we need just a simple command to run
${GC}/gotcloud/gotcloud align --conf ${GC}/inputs/gotcloud.conf --numcs 2
--numcsmeans to run 2 samples at a time.- Depends on your system
This should take < 4 minutes to run.
It should end with a line like: Processing finished in 133 secs with no errors reported
If you cancelled GotCloud part way through, just rerun your GotCloud command and it will pick up where it left off.
Examining GotCloud Align Output
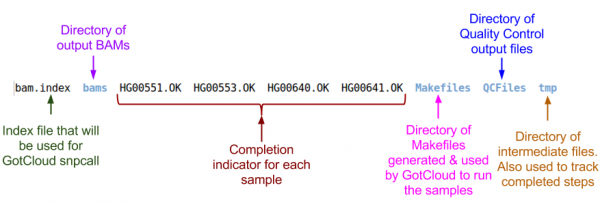
Let's look at the output directory:
ls ${OUTPUT}
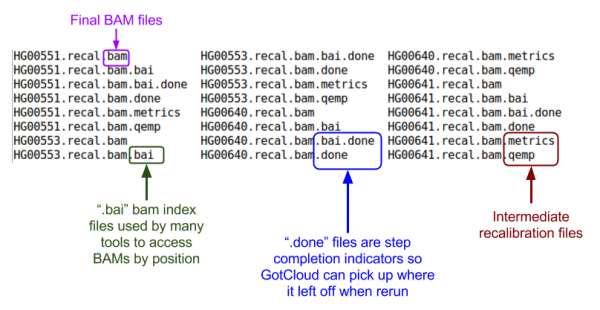
Let's look at the BAMs (aligned reads that are ready for variant calling):
ls ${OUTPUT}/bams
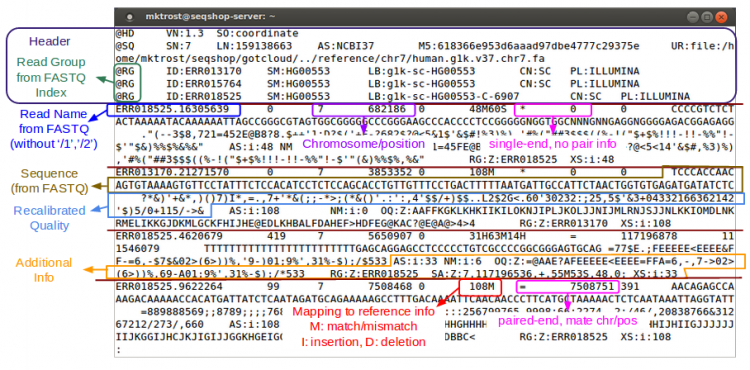
BAM Files:
- Binary Sequence Alignment/Map (SAM) Format
- Maps reads to Chromosome/Position
- For a detailed explanation of the SAM/BAM format, see:
- SAM/BAM Spec: http://samtools.github.io/hts-specs/SAMv1.pdf
- Additional information I put together as I started working with SAM/BAM: SAM
- Consists of:
- Header
- Starts with '@'
- Records - one for each sequence read
- Header
Let's examine a BAM file:
samtools view -h ${OUTPUT}/bams/
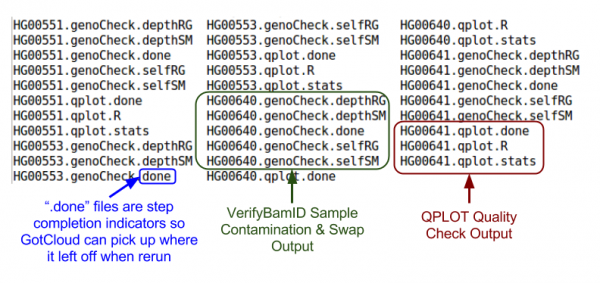
Let's take a look at our quality control output directory:
ls ${OUTPUT}/QCFiles
Check for sample contamination:
- *.selfSM : Main output file containing the contamination estimate.
- If you are only interested in checking sample contamination:
- Check the 'FREEMIX' column for genotype-free estimate of contamination
- 0-1 scale, the lower, the better
- See VerifyBamID: A guideline to interpret output files for more information
- Check the 'CHIPMIX' column for contamination estimates with external genotypes (if provided)
- Check the 'FREEMIX' column for genotype-free estimate of contamination
- If you are only interested in checking sample contamination:
- *.selfRG : Same output to .*selfSM, but separated by readGroup (which might be helpful for library-level examination)
- *.depthSM : depth distribution of reads covering the marker position of the input VCF, across all readGroups.
- *.depthRG : depth distribution of reads covering the marker position of the input VCF, per readGroups.
less -S ${OUTPUT}/QCFiles/HG00551.genoCheck.selfSM
Next, let's look at some quality control metrics:
cat ${OUTPUT}/QCFiles/HG00551.qplot.stats
- 99.16% mapping rate
- 94.01% high quality bases
- 7x coverage
- 31.3% A, 31.3% T
- 18.7% C, 18.7% G
Generate the pdf's of our quality metrics:
Rscript ${OUTPUT}/QCFiles/HG00551.qplot.R
Rscript ${OUTPUT}/QCFiles/HG00553.qplot.R
Rscript ${OUTPUT}/QCFiles/HG00640.qplot.R
Rscript ${OUTPUT}/QCFiles/HG00641.qplot.R
Examine the PDF:
evince ${OUTPUT}/QCFiles/HG00551.qplot.pdf&
The first plot: Empirical vs reported Phred score does not look as good as we would like.
- This is due to the small region used for recalibration
Look at the PDF I produced when I ran the whole genome:
evince ${GC}/example/HG00551.wg.qplot.pdf&
See: QPLOT: Diagnose sequencing quality for more info on how to use QPLOT results.
